How to Undelete Files or Unformat Hard Drive on macOS Sonoma?

updated on 2023-09-28 to Mac Data Recovery Solutions
Page Content:
- macOS Sonoma Recovery 1: Undo deletion operation
- macOS Sonoma Recovery 2: Restore deleted files from Trash
- macOS Sonoma Recovery 3: Restore deleted files from Trash
- macOS Sonoma Recovery 4: Use macOS Sonoma data recovery software
- FAQs about macOS Sonoma data recovery
If you can not find the deleted files in Trash or don’t have a backup, just download a reliable macOS Sonoma data recovery application - such as Magoshare Data Recovery for Mac to help you scan the hard drive. It will find all deleted, formatted or lost files, then select the wanted files and save them by clicking on Recover Now button.
Possibly, you've experienced data loss after upgrading to macOS Sonoma. For example, if you clean install macOS Sonoma and have erased the Mac startup disk, all old files will be erased. There are many other potential reasons for data loss, and if you don't know how to recover deleted/lost files on macOS Sonoma, you'll be like a fish out of water, floundering around frantically trying to figure out what to do.
This comprehensive article was written to help you with the macOS Sonoma recover deleted files to avoid that unpleasant situation. If you've ever wondered what happens to lost files or if any professional data recovery tools can return permanently deleted files, this guide will answer all your questions. If you follow this tutorial to the finish, we guarantee you will fully grasp the subject of Mac restoring deleted data.
macOS Sonoma Recovery 1: Undo deletion operation
To undelete files on a Mac, your first line of defense is the Undo function. Simply hitting the CTRL + Z keys will accomplish this. You can undelete the file deletion by selecting Edit > Undo Move immediately after the fact.
Remember that this workaround is time-sensitive and will only restore your files if you perform it right after erasing them. This strategy is useless if you accidentally close the window or throw away the files.
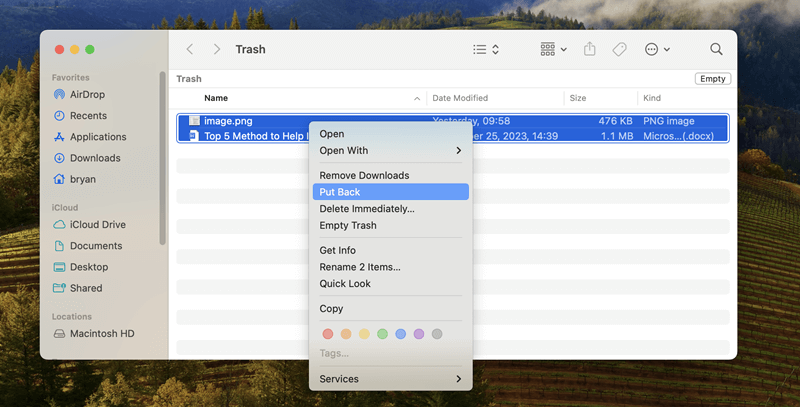
macOS Sonoma Recovery 2: Restore deleted files from Trash
Files will remain in the Trash until you empty them. However, regardless of whether or not you remove the things, they will only remain in the Trash for a month. After that time, they are removed mechanically. If you haven't deleted anything permanently, or it hasn't been 30 days since your previous deletion, you can get your files back by following these simple instructions.
- Open Trash on Mac.
- Find and select the items you want to restore.
- Right-click them and select Put Back.
macOS Sonoma Recovery 3: Restore deleted files from Trash
I've learned over the years that having a backup of your most important data is essential; that way, no matter what happens, you'll still be on the safe side of things. That is where the Time Machine comes in. If you've used this fantastic macOS feature, you can be assured that you can retrieve anything you've accidentally deleted.
You can use Time Backup to reinstall macOS or just restore some of files.
macOS Sonoma Recovery 4: Use macOS Sonoma data recovery software
After upgrading to macOS Sonoma, you can find and download a reliable data recovery software app which is compatible with macOS Sonoma and run it to scan the hard drive to find lost files. Magoshare Data Recovery for Mac is more likely to help if you can't get your lost files back using Trash or other methods. Even if you've deleted them from the Trash, the tool shows you can get them back.
Magoshare Data Recovery for Mac
- Recover permanently deleted files on macOS Sonoma.
- Unformat hard drive on macOS Sonoma.
- Recover lost data from HDD, SSD, USB drive, SD card, camera, etc.


We have tried various data recovery programs that all work with this brand-new Mac OS. No matter the Mac version or circumstance, the greatest results were still obtained with Magoshare Data Recovery for Mac, so we give it our highest recommendation for any data recovery on Mac.
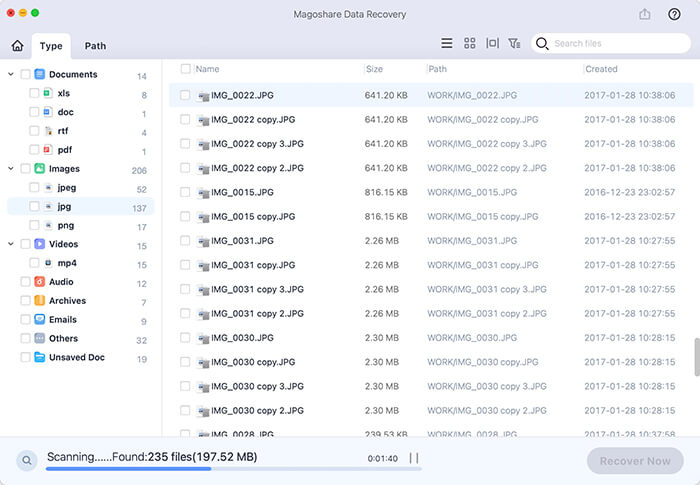
Step 1. Select the hard drive where you delete or lose your files.
Download and install Mac Magoshare Data Recovery for Mac. Then open it on your Mac. It will list all hard drives and connected devices, just select the hard drive where you delete or lose your files to start data recovery.

Step 2. Start scanning for lost files.
After selecting the hard drive, click on Scan button. Let Magoshare Data Recovery for Mac deeply scan the target hard drive and find all recoverable files including existing files, deleted files, formatted or erased files, lost files, etc.
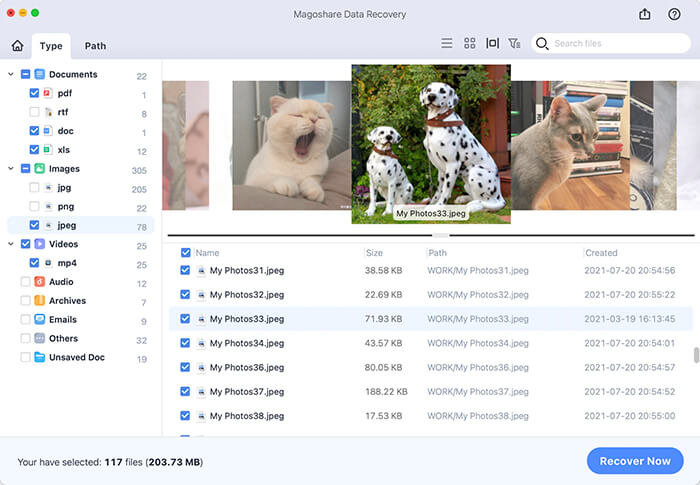
Step 3. Preview and recover lost files.
Once the scan is completed, you are able to preview the images, documents, videos, etc. Then find and select the wanted files, click on Recover Now button to save them.
FAQs about macOS Sonoma data recovery
1. How to undelete files on macOS Sonoma?
The methods listed below can help you undelete files on macOS Sonoma:
- If you just delete some files from a location, just press Ctrl+Z.
- Check if the files are in Trash, if so, select them and choose Put Back.
- If you have a backup, restore the deleted files from backup.
- Download and install a data recovery app to scan the hard drive and recover lost files.
2. What is the best data recovery software for macOS Sonoma?
Many data recover apps can recover lost data in macOS Sonoma, such as:
- Magoshare Data Recovery for Mac
- Do Your Data Recovery for Mac
- Disk Drill for Mac
- Donemax Data Recovery for Mac
- TogetherShare Data Recovery for Mac
3. How to make a backup on macOS Sonoma?
- Download and install disk cloning software - AweClone for Mac.
- Open AweClone for Mac, choose OS Clone mode.
- Connect an external hard drive to your Mac, and select it as the destination drive.
- Click on Clone Now button.
- Clone all data including macOS Sonoma, apps, software, user files, settings from Mac to the external hard drive and create a bootable clone.
Conclusion:
There are more than 2 methods to recover lost data after upgrading to macOS Sonoma. Data recovery software for macOS Sonoma is the best method to undelete files or unformat hard drive on macOS Sonoma. Once you have lost data in macOS Sonoma, don’t use your Mac any more. Download and install Magoshare data recovery for Mac, then run it to scan your hard drive, it will help you find all lost files. Select the wanted files and save them.
It is recommended to back up your Mac before or after upgrading to macOS Sonoma. AweClone for Mac can help you create bootable clone backup for macOS Sonoma. The OS Clone mode can move everything from your Mac to an external storage device.