Recover Lost Photos after the Disk Utility Erased the Hard Drive

updated on 2018-08-25 to Mac Data Recovery Solutions
Summary: If you have erased your hard drive with Mac Disk Utility and want to recover the lost photos, you just have found the right solution. In this article, we will show you how to completely recover lost photos after the Disk Utility erase hard drive with Magoshare Data Recovery for Mac.


Disk Utility is a useful tool that Mac OS puts at our disposal to repair errors in hard drives, but often we end up formatting or deleting the file system of the hard disk when making a repair so we end up losing our photos. At that moment the panic begins to enter because we do not have a backup of those photos and then we give them for lost and without any iota of being able to recover them.
Fortunately, there is a way to recover photos after the disk utility has removed the hard drive and it is possible with Magoshare Data Recovery for Mac, since it is a powerful tool that contains an advanced search and data recovery algorithm that will make You have all your photos back no matter how the disk utility has deleted them.
Why is Magoshare Data Recovery for Mac the best option to recover deleted or lost photos?
Magoshare Data Recovery for Mac is a very simple application to use in which you will be able to recover all your photos of hard disks in which Disk Utility has erased all their content without needing you to be a computer expert or have to spend a huge amount of money taking your hard drive to the technical service of Apple where in addition to taking a long time recovering your data, probably not going to deliver 100% of the photos you need:
Three steps recover lost photos after erasing hard drive with Mac Disk Utility
How to recover lost photos after Disk Utility deleted the hard drive with Magoshare Data Recovery for Mac?
Magoshare Data Recovery for Mac is the best tool to recover lost photos after Disk Utility has deleted the hard drive because you only have to follow these simple steps to have all your photos in a matter of minutes:
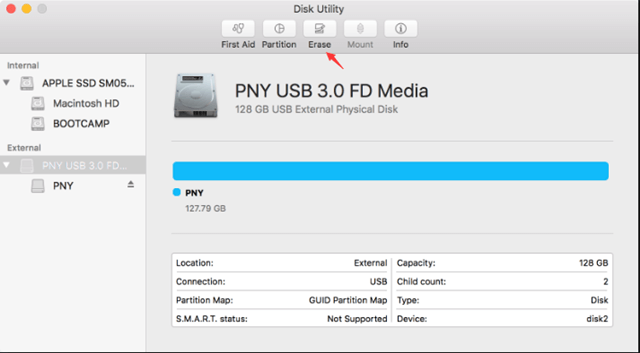
Step 1: Select the hard drive to which Disk Utility has deleted the photos.
After downloading and installing Magoshare Data Recovery for Mac on your computer, you just have to run it to automatically recognize all the hard drives connected to your Mac. Just select the hard drive to which Disk Utility has deleted the files to be able to recover your photos.

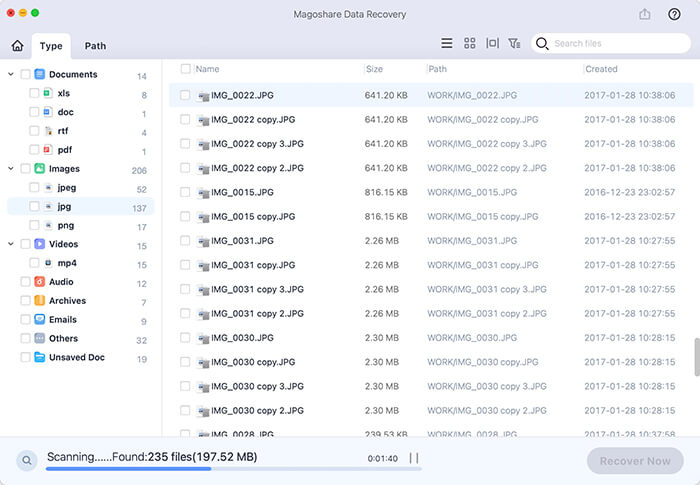
Step 2: Scan the hard drive to find the lost photos.
Once you have selected the hard disk to which Disk Utility has deleted the photos, click on the "Scan" button so that Magoshare Data Recovery for Mac uses its data detection algorithm and scans the hard disk so that it can find the photos lost after Disk Utility erased the hard drive.
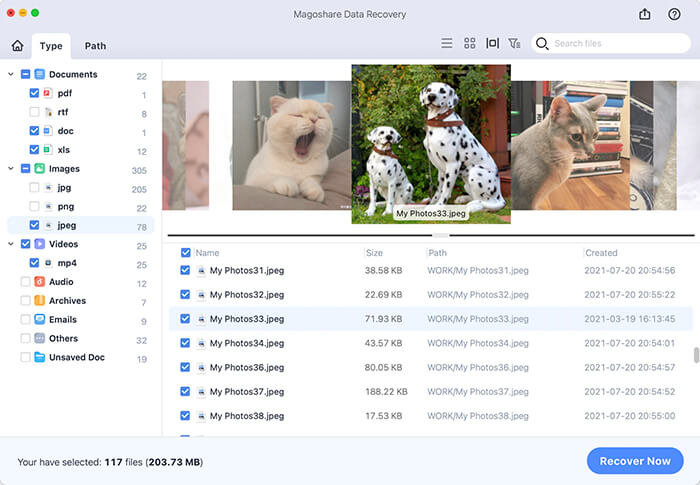
Step 3: Preview and recover the lost photos.
Once the scanning is finished, Magoshare Data Recovery for Mac will show you a preview screen with all photos of the hard disk erased by Disk Utility. You just have to choose which photos you want to recover and then click "Recover Now" to have them back.
Magoshare Data Recovery for Mac can completely restore the lost photos from a hard drive which is erased by Mac Disk Utility. Just run it to scan the erased hard drive, you will quickly get lost photos and other data back!