Fix A Write Protected USB Flash Drive

updated on 2022-09-20 to Removable Device Data Recovery
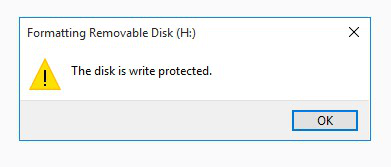
Carrying a USB around for data storage, data transfer, or setting up a Windows To Go workspace on a PC has become commonplace among office employees today. However, the error message "The disk is write protected" will occasionally appear when you need to format the USB or write data to it.
Here is a straightforward method to disable the write protection and hassle-free format of the USB flash drive or pen drive.
What Is “The Disk Is Write-Protected” Error on USB?
When formatting a write-protected USB pen drive, do you encounter the “disk is write protected” error? What does it imply when you try to format a flash drive, pen drive, or SD card and you receive the error message “The disk is write-protected”?
It indicates that your USB pen drive has been locked by third-party encryption software or that the Windows operating system has set administrator restrictions. The registry entry may also be damaged or infected with a virus. You cannot format a USB flash drive with the write protection status because you will see the error message "The disk is write-protected."
You might think, "How can I deactivate write protection on a USB drive?" Using the fixes below, you must disable write protection on USB drives, flash drives, SD cards, external hard drives, etc.
Why have USB sticks become write-protected?
You should be curious about potential causes whenever you encounter the write protection problem. A few reasons are given below:
- A physical write protection switch is present on some SD cards and USB devices. Put it in the open position if this is still happening.
- Infections attack the SD card or USB drive. Avoid using your antivirus software if you discover an infection.
- There is no more room on the SD card or USB disk.
Guide to Fix ‘The Disk Is Write Protected’ Error on USB Flash Drive
You must first resolve the "the disk is write protected" error and remove write protection from your problematic devices since you cannot format a write-protected device. In this section, you can attempt several of these methods to try and remove the write protection on your USB, pen drive, etc., storage.
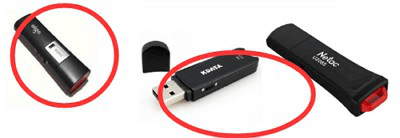
1. Unlock Write Protected USB by Switching Its Lock
Your USB flash drive or pen drive is locked and write-protected if you've already locked it by turning the Lock switch to ON. It implies that you are unable to alter or format the device. Here's how to open a write-protected USB drive:
Locate the physical switch on your pen drive or USB device.
Change the switch’s state from ON to OFF.
You can now re-access or format the device by connecting the USB to your PC.
2. Remove Write Protection from Device Using CMD
Step 1: Type cmd into the search bar, then choose "Run as Administrator" from the context menu of "Command Prompt."
Step 2: Enter each of the command lines in the following format.
- Diskpart
- List disk
- Select disk #
- Attributes disk clear readonly
Replace # with the write-protected flash drive or memory card number.
Allow the CMD command to disable your device’s write protection.
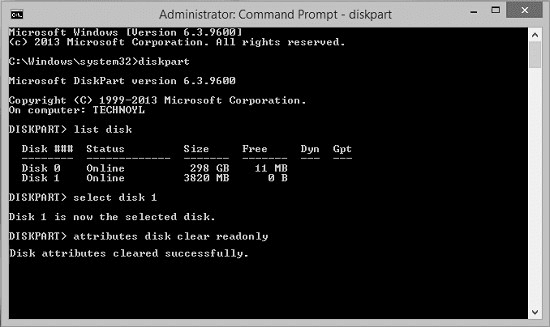
Step 3: When the procedure is complete, type exit.
3. Cleanup Virus that Causes Write Protected USB Flash Drive
Storage devices like USB flash drives may occasionally become write-protected or locked due to virus infestation. Running specialized virus cleaner software will remove the virus and unlock the device, which is the best approach to solve this problem.
You might use the following recommended virus eradication programs:
- Antivirus
- Norton AntiVirus
- McAfee
- BitDefender
- AVG
To remove any write-protection viruses from your USB or pen drive, you need to install one of the suggested virus cleaners, connect the problematic device to your PC, run the virus cleanup application, and let it do its thing.
4. Edit Registry
Step 1: Press “Windows + R” on your keyboard. Enter “Regedit” or click “OK” in the Run dialogue box that appears to launch the Registry Editor.
Step 2: To access the path, expand the entries in the left-hand window.
Step 3: Select “New” and “Key” from the context menu by right-clicking the Control (folder) key. The new key’s name is StorageDevicePolicies.
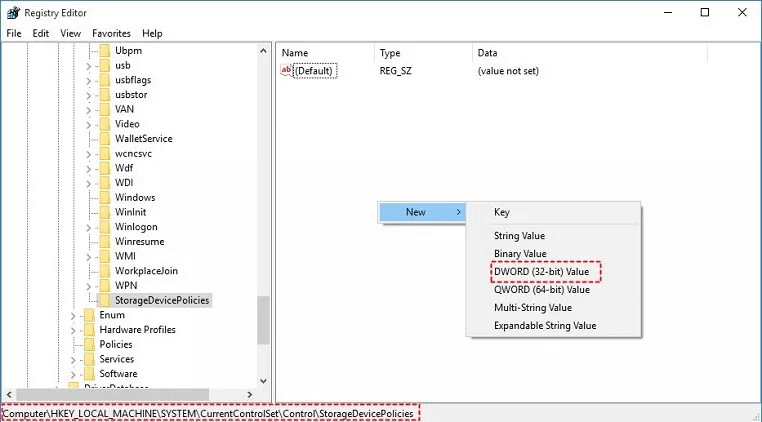
Step 4: Select the freshly produced key by right-clicking the empty area in the right-hand window; after selecting "New," select DWORD (32-bit) Value. WriteProtect should be added as a new DWORD.
Step 5: Double-click the newly created DWORD to change its Value from 1 to 0. To change, select "OK."
Step 6: After shutting off Registry Editor, restart your computer.
5. Disable BitLocker Encrypted
Your files will be encrypted and secure if BitLocker is enabled on your USB drive. You'll need a password or recovery key to turn off BitLocker for a USB stick. You will need to reformat the hard drive if you have no other options.
Follow these instructions to fix a write-protected USB on a PC:
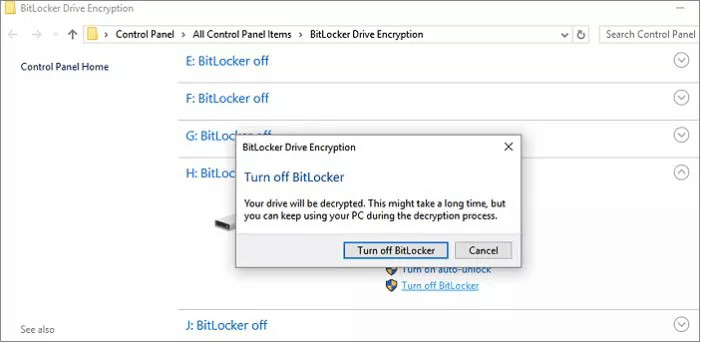
Step 1: Activate “File Explorer” and look for the storage device there. BitLocker was activated for the device if the icon included a padlock.
Step 2: Right-click the icon and choose "Manage BitLocker" from the context menu. This action launches the BitLocker Drive Encryption window, which lists all storage devices and their encryption status.
Step 3: Right-click the encrypted USB drive and choose “Turn off BitLocker” to disable BitLocker. Before entering the recovery key, enter the password or make another selection. The state indicates that the device is being decrypted and that BitLocker will be turned off after it is completed.
Try copying something on the USB stick again after you’ve disabled BitLocker to see whether the problem has been solved.
6. Format write-protected USB with free write protection removal tool
If you have followed all of the preceding instructions but can still not remove the write protection from your USB device, the file system may be corrupt. You might attempt to format the USB disk to resolve the issue. How do you format a USB that has write protection, though?
With the use of a free write protection removal program, you can accomplish this. Pick a program that works with all types of disks, including mechanical hard drives, SSDs, SSHDs, external hard drives, USB flash drives, SD cards, and more. Additionally, it allows you to rapidly and easily format USBs with write protection.
Recover lost data from a Write-protected or formatted USB drive
Data loss can happen whether you’ve formatted the USB flash drive or not. If you want to recover data from a write-protected USB flash drive or formatted USB flash drive, just try data recovery software - such as Magoshare Data Recovery.
Magoshare Data Recovery
- Recover data from write-protected USB flash drive.
- Recover deleted or formatted data from USB flash drive.
- Recover inaccessible or corrupted data from USB flash drive.


Now, download and install Magoshare Data Recovery, open it on your computer. Insert the USB flash drive into your computer.
Step 1. Open Magoshare Data Recovery, select the USB flash drive to start data recovery.
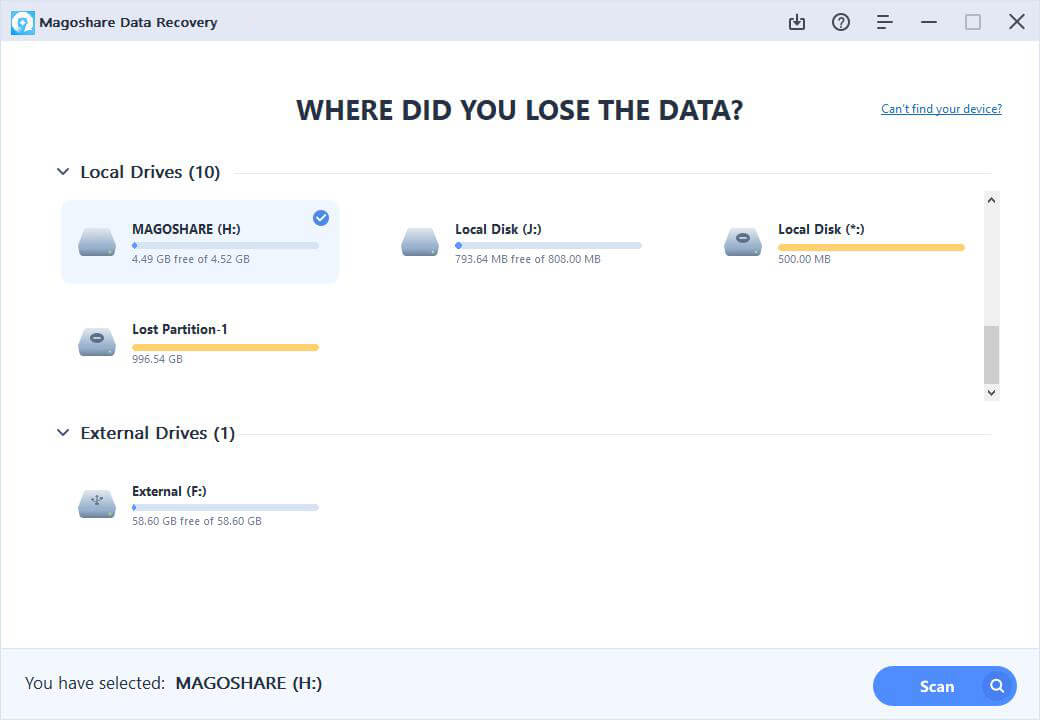
Step 2. Click on Scan button. Magoshare Data Recovery will deeply scan the USB flash drive and find every recoverable file.
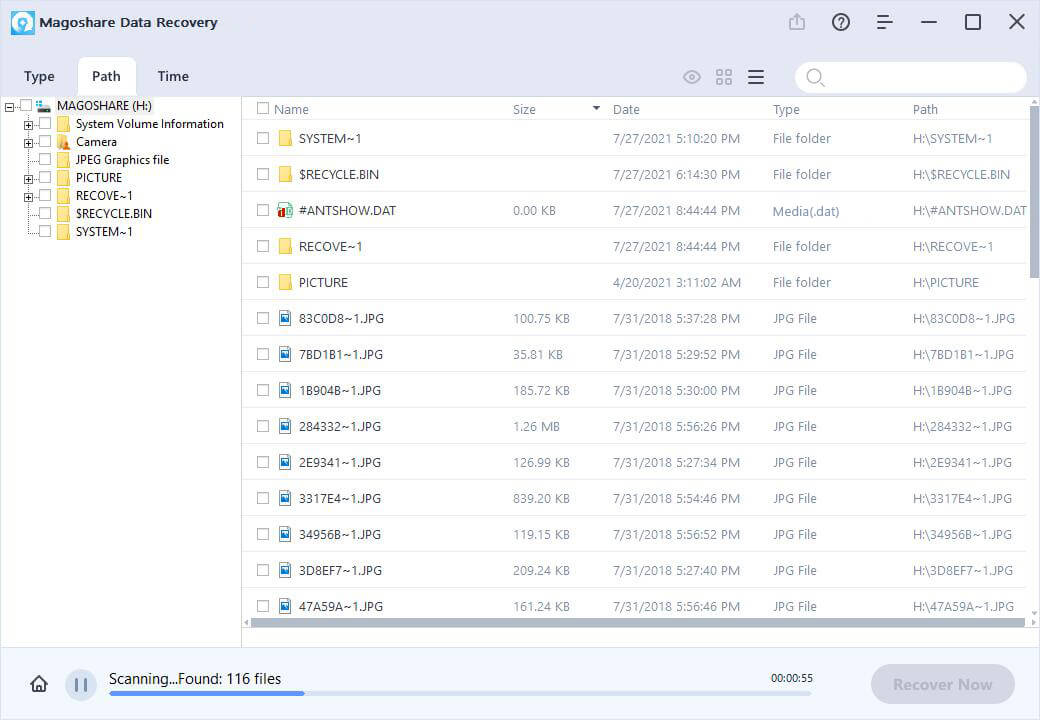
Step 3. Once the scan is completed, you can preview all recoverable files. Select the wanted files and save them.

Conclusion: USB flash drive write protection errors fixed
Sometimes, the issue is straightforward. Occasionally, the point is challenging. In either situation, perhaps we were able to provide you with a fix. If your USB drive problems continue, something more may be happening.
In any case, you have many more debugging tools at your disposal now and ought to be able to operate your USB devices again, maybe sparing you some cash and the agony of losing all of your stuff!