How to Create A Bootable USB Installer for Mac OS?

updated on 2022-03-28 to Disk Clone Solution
In this article, we'll explain the process to establish a bootable installer for the Mac operating system, whether you choose to update to the latest version of macOS on multiple Macs, try the new macOS beta, perform a fresh install of macOS, or just have an emergency disc in case your Mac has problems and you don't want to connect to the internet or go into Recovery mode (or you can't get into Recovery mode).
You've come to the correct spot if you want to learn how to construct a bootable installation of macOS Monterey, Big Sur, Catalina, Mojave, or an older version of Mac OS X or macOS.
You may alternatively install macOS on a separate volume on your hard drive using your bootable installer (or on a partition if you are running an older version of the Mac OS). It's also a simple method to revert to a previous version of macOS, and it's a good alternative if the installer takes a long time to download and you don't want to spend the next several days installing it on many Macs. Once is more than enough!
When Apple released OS X Mavericks in 2013, building a bootable version of the Mac operating system got a lot easier. It was possible to use the Terminal command createinstallmedia with that version of Mac OS X, and all subsequent versions.
What you'll need to create a Mac bootable USB?
To create a bootable install drive, you'll need two things: a USB stick (or a Thunderbolt drive) and the installation files. Once you have those two items, the procedure should go quickly.
1. A 15-gigabyte flash drive (at the very least!)
We recommend a 15GB (or larger) hard disc; in fact, a larger drive is recommended: the Monterey installation was 12GB, while Big Sur's installer was 13GB. We advocate using a Flash memory stick rather than a traditional hard disc since it is faster.
You'll also benefit from USB 3, or USB Type C (if you have a recent Mac, this may be your only option) (otherwise you will need an adapter). If you have an M1 Mac, you might be better off using a Thunderbolt drive because USB drives have been known to create problems with the M1. We suggest the LaCie Portable SSD in our roundup of the top SSD drives for Mac.
Note: If you have data on the drive you want to use, you will need to move it to another drive or purchase a new drive since it will be formatted and deleted completely.
2. The files for installation
You can either acquire the installation files from Software Update in System Preferences, the Mac App Store, or you'll have to get them from somewhere else, depending on the version of macOS you're running and which version you wish to install.
The Mac App Store is probably the simplest solution, although there may be issues depending on the version of macOS your computer is running, and getting older installation files might be problematic - we have another post on how to download earlier macOS versions.
How to make a macOS bootable installation
We can begin the process of creating the bootable installer now that you have the installation files.
Note that the createinstallmedia technique described here does not function with OS X 10.6 Snow Leopard or previous versions of OS X; it requires OS X 10.7 Lion or above. Also, as the processes have changed significantly since Mavericks, you should read this earlier post instead if you want to construct an installation of one of the 'Cat' versions of Mac OS X.
Since Mavericks, making a bootable macOS installation only takes one Terminal command. Using the createinstallmedia command, you may produce a bootable copy of an installer on any disc attached to your Mac.
1. Connect an external disc with at least 15GB of space, since the installation will need that much.
2. Disk Utility will open (press Command + space bar and type Disk Utility).
3. In the sidebar, pick the root disc (the following step will not work if you merely select the volume).
4. Select Erase from the drop-down menu.
5. As the Format, select Mac OS Extended (Journaled).
6. As the Scheme, choose GUID Partition Map.
7. By default, your drive will be named 'Untitled,' but you may rename it to anything like'macOS' or 'USB.'
8. Select Erase from the drop-down menu.
9. Wait as Disk Utility sets up the disc and creates the partition (this can take a few minutes).
10. After that, click Done.
11. Now open Terminal (the simplest method is to press Command + spacebar and then type Terminal).
12. Press the Enter/Return key.
13. A password will be requested by Terminal. This is the password for your user account. It's alright if you don't see characters emerge as you type them in. Enter your password once you've typed it in.
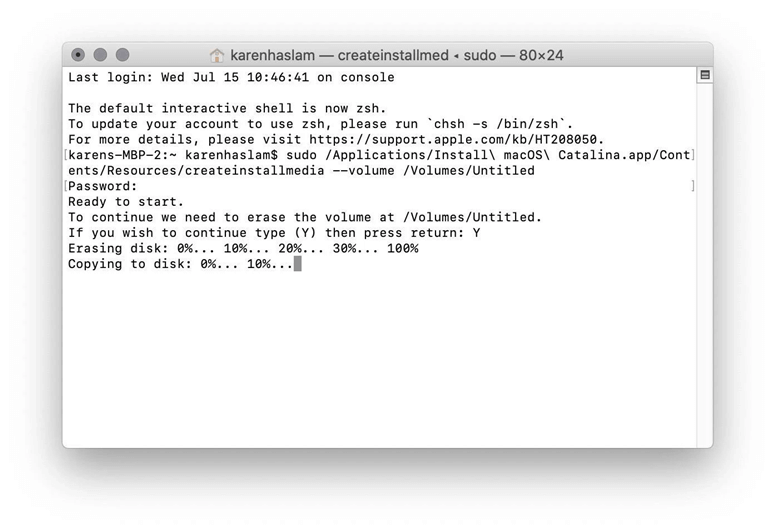
14. Terminal will tell you that it is going to delete the disc (so make sure there isn't anything vital on it if you followed the steps above and formatted it). Press Y and then Return if you wish to continue. The procedure might take a long; you'll notice "Erasing Disk: 0%... 10%... 20%... 30%...100%...
This is how to create a bootable installer for MAC OS.
Of course, you also can use a easy-to-use disk clone tool - AweClone for Mac to help you quickly create a bootable disk for Mac OS.

