Easy steps to recover deleted, formatted and lost data from local disk and external device.
Free TrialHow to Create Safely Remove Hardware Shortcut in Windows 11/10?

updated on 2022-05-22 to How To
Do you know how to properly and safely remove an USB flash drive from your computer? I'm sure there aren't many. Our bad habit of randomly removing USB drives, external drives or memory cards from PCs without properly ejecting them may lead to data loss.
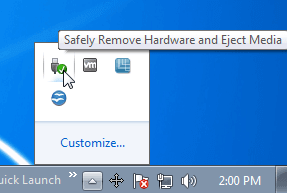
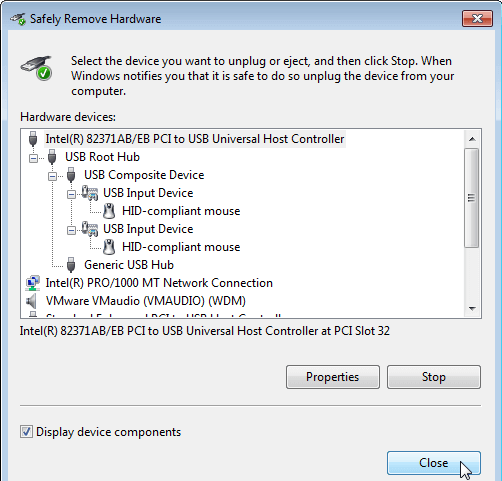
If you often use USB storage devices, such as storage devices or external hard drives, you are probably well acquainted with the Safely Remove Hardware icon in the taskbar. This icon must be clicked to access a menu that enables you to remove external USB drives.
Windows "Safely Remove Hardware" function is not a new one. It may be found in many prior versions of Windows. The user may utilize this window to swiftly and securely power off and remove a storage device to avoid data loss. In Windows 10/11, we'll show you how to make a shortcut to the Safely Remove Hardware dialogue box.
Create A Windows Safely Remove Hardware Shortcut
Perform the following steps to create a Safely Remove Hardware shortcut on Windows 11/10, as follows:
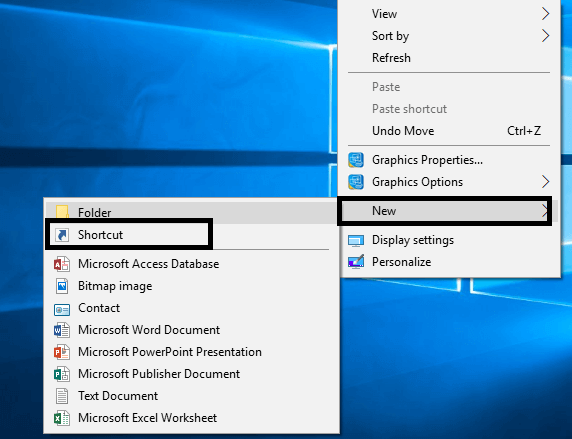
Right-click or press and hold (for touchscreen devices) on an empty spot on your desktop, and choose the New and Shortcut option from the drop-down menus.
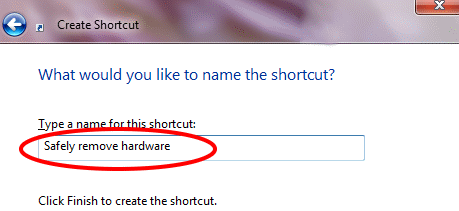
You'll see a window appear, allowing you to type the command RunDLL into it - %windir%\System32\rundll32.exe shell32.dll,Control RunDLL hotplug.dll
To proceed, click the Next button.
Use the name "Safely Remove Hardware" for your shortcut and then click on the Finish button.
After that, a shortcut will be created on your desktop.
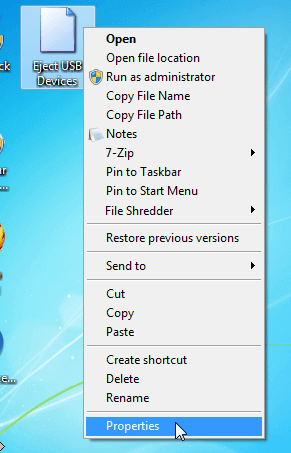
Now, right-click on the shortcut and choose Properties from the menu that appears.
The Shortcut Key -None may be found in the Shortcuts tab.
As soon as you press S on your keyboard, the instruction will change to CTRL+Alt+S.
Click Apply and then OK to finish process.
Safely Remove Hardware has been added to your shortcuts.
As an alternative to creating a new shortcut, you may use Taskbar Settings to remove hardware from your desktop safely.
Using Taskbar Settings, Safely Remove Hardware From Windows
Open the Taskbar Settings by performing a right-click on the Taskbar.
Go to the Taskbar corner overflow.
When you turn on the Windows Explorer button, you'll notice the icon on your taskbar's System Tray.
With the button in the Taskbar corner overflow settings toggled on, you may also remove Bluetooth devices without risking damage.
Modify The Icon Of The Shortcut
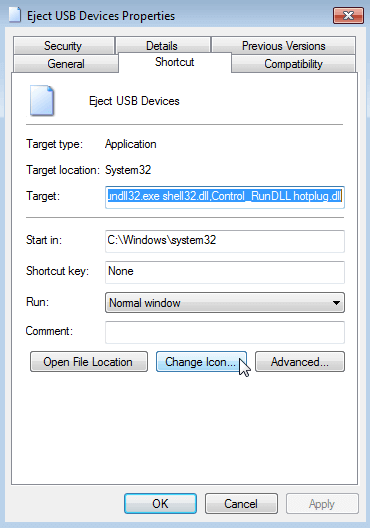
Simply right-click and choose Properties from the context menu to alter the shortcut's icon.
There is a Properties dialogue box on the screen. Verify that the Shortcut tab is visible, and then hit the Change Icon button to change the icon.
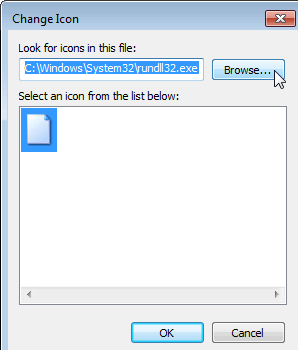
The dialogue window for changing the icon appears. A new icon may be selected by clicking "Browse."
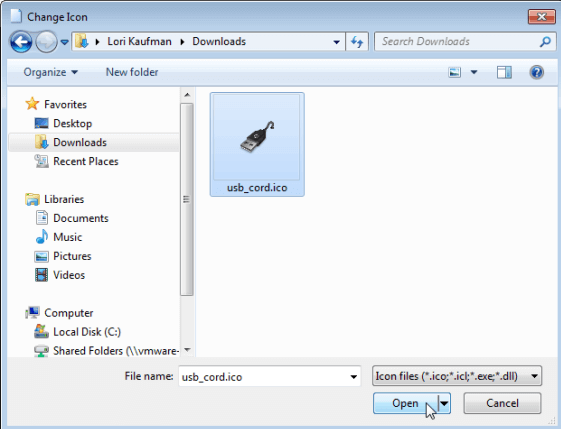
Selecting an icon file is done through yet other Change Icon dialogue box. Go to where you kept the.ico file or the.icl,.exe, or DLL file that contains the desired icon and double-click on it. Click Open after selecting the desired file.
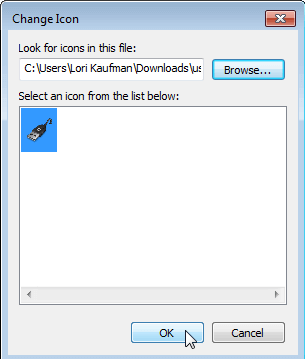
Returning to the Change Icon dialog box, the icon file you chose is shown in the box. It is possible to choose numerous icons (.icl,.exe,.dll) in a single file, and all of them will be shown in the box. Click on the icon you want to use and then press OK.
You may see a shortcut icon on the Shortcut tab using the Properties dialogue box.
Make A Shortcut On Your Computer Keyboard
Launching the shortcut is also possible through a keyboard shortcut. It's easy to accomplish this by navigating to the Shortcut tab in Properties and clicking the shortcut key edit box button. To make use of a keyboard shortcut, just hit the necessary keys. The keys are typed automatically into the edit box.
To exit the Properties dialogue box, click OK.
The desktop shortcut with a personalized icon is present.
To open the Safely Remove Hardware dialogue box quickly, just double-click the shortcut icon.
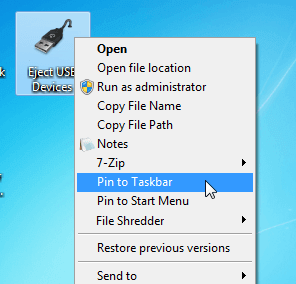
The new shortcut may be pinned to the Taskbar for quick access to the Safely Remove Hardware dialogue box. In order to accomplish this, right-clicking a shortcut on the desktop and choose Pin to Taskbar from the menu.
The Taskbar shortcut has been added. To open the dialogue box for safely removing hardware, just click it once.
Keep in mind that you may also use your keyboard's built-in shortcuts.
Conclusion
External hard disks and USB devices should be carefully removed to prevent data loss. I hope this guide will enable you to develop a shortcut for removing external devices. Please spread the word about this article if you like it. Although it won't need much of your time, your contribution will be invaluable as we continue to develop. Thank you very much for your help!
Hot Magoshare Products
Securely and permanently erase data before selling, donating or giving away PC and digital device.
Free Trial
Clone boot disk, external disk, USB flash drive, memory card and more on Windows PC.
Free Trial