Three Methods to Recover Lost Data after Upgrading to macOS Monterey

updated on 2021-10-11 to Mac Data Recovery Solutions

Quick Navigation:
- Why did the macOS upgrade wipe out part of some data?
- Method 1: Look In A Different Folder (macOS Monterey Data Recovery)
- Method 2: Recover Lost Data from Time Machine Backup if You Have
- Method 3: Recovery lost data on macOS Monterey with data recovery software
After upgrading to macOS Monterey, many Mac users have discovered that their photo collection, iTunes library, and other personal data have been gone. This sort of thing usually happens during an upgrade, which is why you should make a backup of your Mac before doing so. Deleted data in macOS Monterey can't be retrieved or recovered when the trash bin has been emptied. Have no fear; we'll show you how to recover lost data on macOS 12 Monterey in three different ways.
Why did the macOS upgrade wipe out part of some data?
1. When storing and restoring old photographs and media assets, different versions of iTunes use additional file and database formats. During the new transmission and storage, there was an odd error in the data.
2. macOS previously utilized HFS plus as a file system to store files until version 10.13. It switched to using APFS to store all user and system data from version 10.14 to 12.0. Use Time Machine Backup to copy your data before updating to macOS Monterey from an older version of the operating system.
Different Data Recovery Methods:
Pre-install your Mac with an up-to-date copy of your data. When something unexpected happens, like data loss, it's usually a good idea to back up everything before making any changes. However, if you fail to make a backup of some crucial files, don't panic. There are three effective methods to help in recovering deleted or lost data on Mac.
Method 1: Look In A Different Folder (macOS Monterey Data Recovery)
The year before last’s macOS Catalina update brought about this issue. If you have a Macintosh HD, files on the root of the disc will be moved to /Library/SystemMigration/History/Migration-UUID/QuarantineRoot when you update to macOS Catalina, according to Apple Developer notes in the macOS 10.15 release notes. You can also check this folder after the macOS Monterey upgrades to see if the moving objects are still there.
Method 2: Recover Lost Data from Time Machine Backup if You Have
In recovering some of those data, or perhaps your complete Mac, the Time Machine program is very user-friendly. Only those with Time Machine backups can use this technique. See if you can recover your Time Machine Backup data by following these procedures.
Use Time Machine To Restore Individual Files Or Folders
Step 1. To begin, open Launchpad on your Mac and select Other from the drop-down menu.
Step 2. Locate and click on the Time Machine icon to get started.
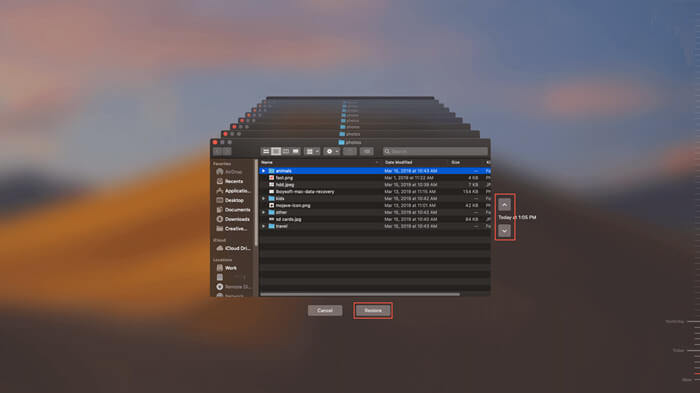
Step 3. Browse the backups by using the arrows at the bottom and the chronology on the left.
Step 4. Click Store after you've selected the files or folders you want to recover from Step 3.
Step 5. Make a Time Machine backup and use that to restore your Mac.
Recover data:
After updating to macOS Monterey, you can recover data from a Time Machine backup if your Mac crashes and you lose everything.
Step 1. Restart your Mac and hold down the Command and R keys at the same time while the startup DVD is loading. You'll see the macOS utility window when your Mac boots into macOS Recovery mode. (Please try again if your Mac won't boot into macOS Recovery mode.
Step 2. Click Continue after selecting Restore from Time Machine Backup in macOS Utilities.
Step 3. In the third step, review the Restore Your System page information before clicking Continue.
Step 4. Click on the disk that contains the Time Machine backup and then click Continue.
Step 5. A list of all backups in the form of an APFS snapshot will be displayed. Click Continue after selecting the most recent backup of your hard drive. Once you've picked a backup version, your Mac will restore that backup and restart.
Method 3: Recovery lost data on macOS Monterey with data recovery software
Data recovery software can help you quickly and efficiently recover your files if you have lost them after updating to macOS Monterey. Data recovery for macOS Monterey is easy with Magoshare Data Recovery for Mac.
Magoshare Data Recovery for Mac
- Recover permanently deleted files on macOS Monterey.
- Recover lost files on macOS Monterey due to formatting hard drive, OS upgrade, power failure, partition loss, virus infection, etc.
- Recover lost data from PC, Mac, HDD, SSD, memory card, USB flash drive, etc.


Now, follow the steps below to recover lost data after upgrading to macOS Monterey.
Step 1. Download Magoshare Data Recovery for Mac and install it on your Mac. This software can recover deleted/lost files from various storage devices, including Mac HDD/SSD, external hard drives, memory cards, USB flash drives, and digital cameras.
Step 2. Magoshare Data Recovery for Mac will show all drives and devices. Select the hard drive where you delete or lose your files.

Step 3. Click on the Scan button to begin the scanning process. Advanced recovery mode will thoroughly scan the the hard drive to find every recoverable file.
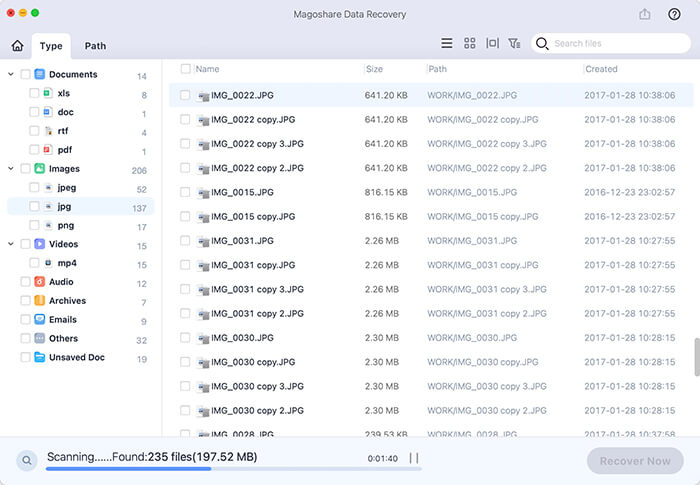
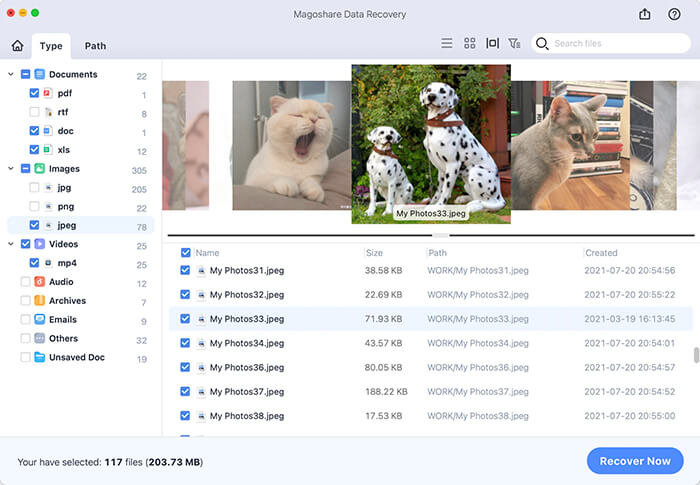
Step 4. You can preview all recoverable files once the scan is completed. Select the files that need to be recovered and click on the Recover Now button to save the files.
Conclusion:
We sincerely hope you found this post helpful in locating deleted or lost data on your macOS Monterey computer. Even if your files are permanently deleted, you can use Time Machine backup in case of data loss. If you've accidentally deleted or lost files on your Mac, data recovery software can help you retrieve them in easy steps.