Easy steps to recover deleted, formatted and lost data from local disk and external device.
Free TrialHow to Disable Windows 11 Updates?

updated on 2022-03-21 to How To
Even though Microsoft tests its updates, there have been several instances of defective upgrades causing system instability in current history. If your plan doesn't work correctly after an installation, removing Windows 11 upgrades may be useful.
This post discusses how to see and delete upgrades in Windows 11, including how to uninstall them in Recovery Mode if the machine won't start properly. Let's get started without further ado:
Updates for Windows 11 can be disabled through the Settings app
To begin, open the Settings app. By hitting Win + I on your keyboard, you may do so. In the left pane, select or press Windows Update, then Update History.
In the Windows Update area of the Settings app, go over there to Update history.
All downloaded upgrades are listed here, along with information and the time they were deployed. The categories make up the list are the following:
- 1. Feature Updates are major updates to Windows 11 that add new features and alter the operating system in significant ways. On some computers, these sorts of upgrades may create instability. If you have trouble after installing a feature update, you should remove it right away.
- 2. Quality Updates do not bring any new features or major enhancements. They're maintenance updates that aim to correct bugs, problems, and security flaws while also increasing dependability. They can, however, have an influence on the stability of your system.
- 3. Updates for the hardware components within your computer, such as the network card, mouse and keyboard, graphics card, and so on. Windows Update drivers are normally tested and signed by Microsoft, and therefore should not cause system instability in most circumstances.
- 4. Updates to the definition database that Microsoft Defender Antivirus uses to defend you against malware and other threats. You may normally disregard such updates since they are unlikely to cause system instability.
- 5. Updates to programs and tools included in Windows 11 are referred to as "Other Updates."
You can enlarge and minimize each section to traverse the list of changes. You may discover more about each version by hitting or pressing the Learn more link next to it.
What are the different sorts of Windows 11 updates that are installed?
Determine which update is creating issues and jot down or remember the number (the one that starts with KB). Next, pick Uninstall updates from the drop-down menu. This takes you to the Control Panel's Installed Updates area.
Choose Uninstall updates from the drop-down menu.
The Installed Updates box displays updates for Windows 11 and other applications on your computer. Locate the update you wish to uninstall in the Microsoft Windows category.
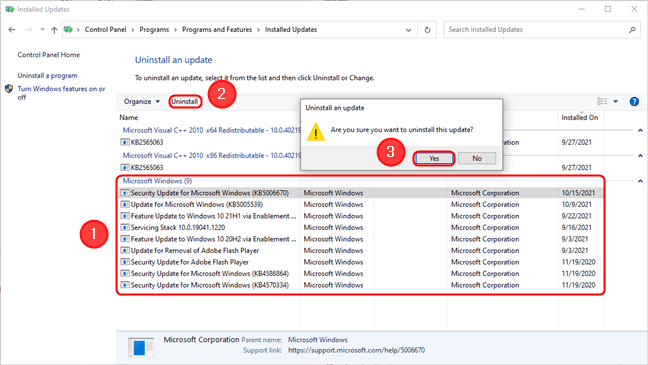
Now choose the update you wish to uninstall and click Uninstall. You may also double-click the update to activate it. Select Yes in the popup window to confirm the action.
To remove Windows 11 updates, go to Control Panel
If you like, you may use the old Control Panel. It may be accessed by pressing Win + R on your keyboard, then typing control and pressing Enter. Then, under Programs, click or touch the "Uninstall an application" link.
To see a list of applications and programs on your smartphone, tap Uninstall a software.
On the following screen, in the upper-left corner, select "View installed updates."
By tapping the Browse installed updates button, you may go from applications to updates.
The approach is now the same as before: choose the update and then click Uninstall in the list heading.
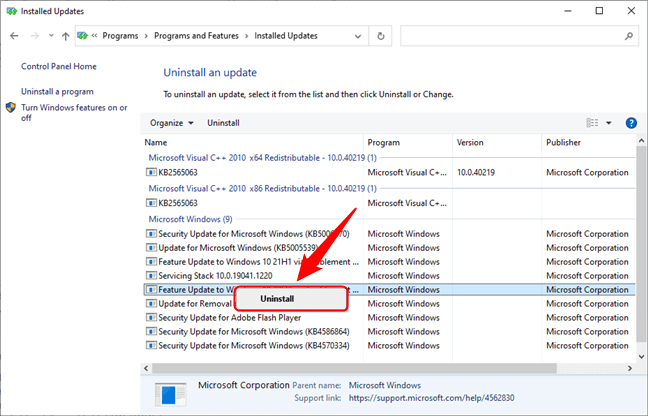
You may also right-click (or press and hold) the update you wish to uninstall and then select Uninstall.
You may uninstall an update by right-clicking it and selecting Uninstall.
Select Yes in the popup window to confirm the action.
Updates for Windows 11 may be uninstalled using the Windows Terminal
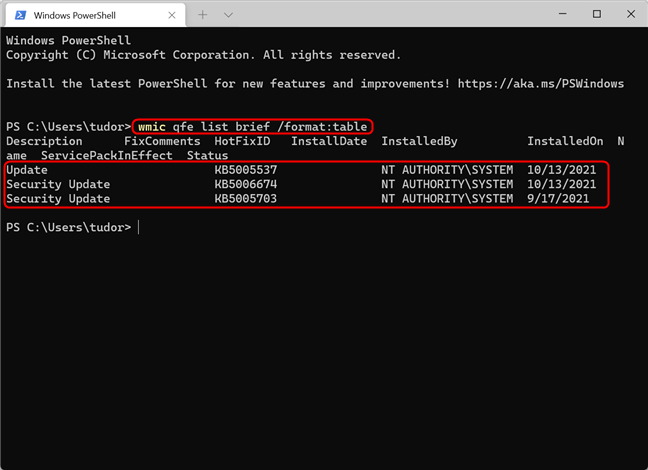
If the techniques above fail or you prefer the command-line interface, you may delete updates using Windows Terminal. To begin, log into Windows Terminal as an administrator. After that, type the following command:
wmic qfe list brief /format:table
Enter the code. As seen in the picture below, this command displays a list of all installed updates.
Simply execute the following command (or copy and paste it into a Terminal window) to remove an update: wusa /uninstall /kb:HotFixID
where HotFixID is the update's unique identifier.
Let's imagine we wish to remove the update KB5005537 as an example. To do so, put wusa /uninstall /kb:5005537 at the command prompt. To run a command, press Enter after typing it. Now press Yes in the dialogue box to confirm the operation.
These are the techniques for uninstalling Windows 11 updates. Before we wrap up this tutorial, let us know which one you prefer. Do you know of any other methods for removing the updates? Also, if you have any suggestions for improving this article, please contact us.
If you want to recover lost data after Windows 11 update, just try Magoshare Data Recovery to help you get all lost data back.
Hot Magoshare Products
Securely and permanently erase data before selling, donating or giving away PC and digital device.
Free Trial
Clone boot disk, external disk, USB flash drive, memory card and more on Windows PC.
Free Trial