Transfer Photos from iPhone to Mac

author

Anna

updated on 2022-02-13 to How To

Do you want to transfer your photos from your iPhone to your Mac in a quick and efficient manner? Is there a quick and easy way to move images from your iPhone to a Mac?

To preserve space on the iPhone, whether you use your Mac to edit images and movies or as a backup storage device, this is a great tip to remember. With the help of this guide, you will learn the best ways to transfer images from your iPhone to a mac. Additionally, it describes what to do if you encounter any difficulties.

Methods to transfer photos from iPhone to Mac

We advise you to choose a way that works for you and make it a regular system component for transferring images and videos. Listed below are a few possibilities to consider:

Method 1: Using iCloud Photo Stream

Photo Stream does not use iCloud storage space. It's crucial to keep in mind that pictures in Photo Stream will only be available for 30 days. Even though Photo Stream doesn't publish your videos, you can effortlessly browse your photos on other devices.

Wi-Fi is required for both ways, and photos will be automatically sent when your device is connected to Wi-Fi. If you want to use Photo Stream, you'll need to activate it on both the iPhone and the Mac.

  • Open the Settings app on your iPhone.
  • Choose your Apple ID profile at the very top of the screen.

transfer photos from iPhone to Mac

  • To access iCloud, click the iCloud button.

transfer photos from iPhone to Mac

  • Choose Photos. Enable My Photo Stream by turning it on.

transfer photos from iPhone to Mac

  • Open the Photos app on your Mac. Before continuing, make sure you have iCloud for Windows installed on your PC.
  • In the Photos menu, choose Preferences.

transfer photos from iPhone to Mac

  • Select the iCloud option.
  • A checkmark will appear next to the box that says "My Photo Stream." To complete the process, press the Done button.

transfer photos from iPhone to Mac

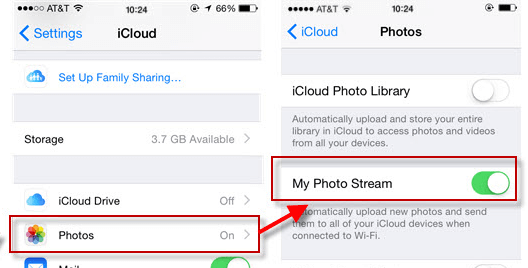
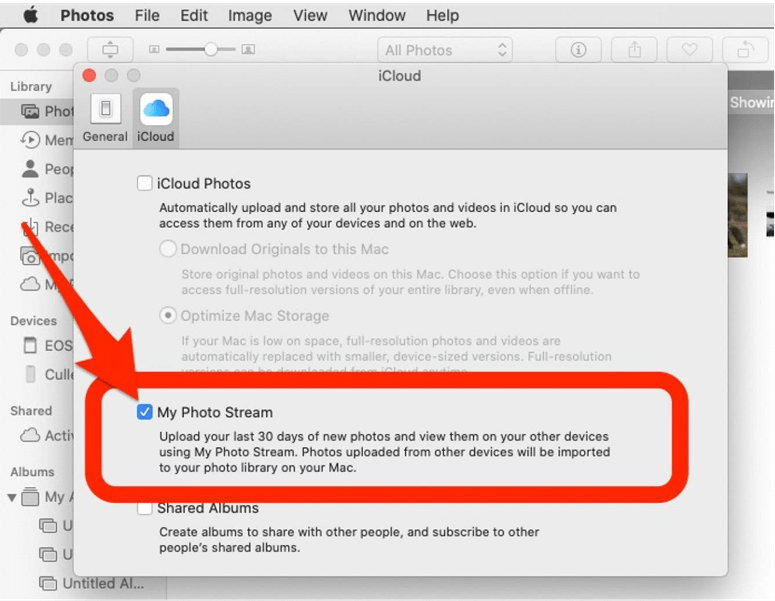
When you're in a Wi-Fi area, your images will be instantly uploaded to your Photo Stream. However, keep in mind that you may save up to 1000 photographs in your Photo Stream for 30 days.

Method 2: Using iCloud Photo Library

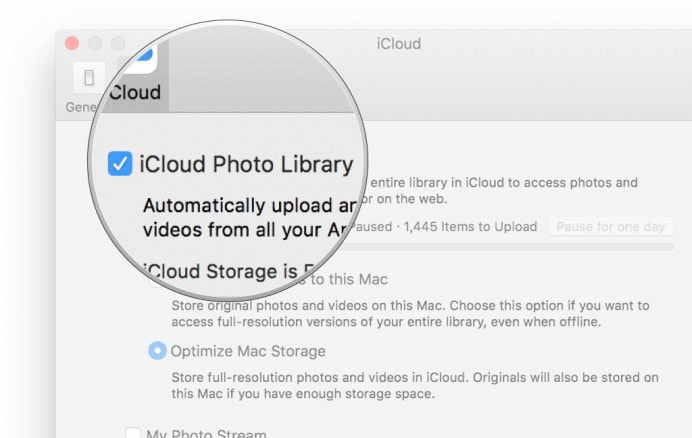
There is just a slight distinction between iCloud Photo Library and the other iCloud services in that iCloud Photo Library uploads all of the photographs on your device to the iCloud.

  • In Settings on your iPhone, choose your Apple ID or name, select iCloud, and tick the "iCloud Photo Library." Your iCloud account servers would begin uploading all of your images.
  • Launch Photos on your Mac and choose the photo tab. Go to the "Options" menu, then click "Preferences," and then "iCloud."

transfer photos from iPhone to Mac

  • Check the "iCloud Photo Library" option in the new window. All of your uploaded photographs may now be seen on your Mac, and you can select to download them.

transfer photos from iPhone to Mac

Method 3: Using AirDrop

If you want to transmit a picture to a Mac, iPhone, or iPad user, AirDrop is the best way to do so. The only requirement is that they connect to the same Wi-Fi network as you and stay within Bluetooth range.

To send photos with AirDrop, follow these instructions:

  • Open the Photos app and choose the photos you want to transmit.
  • AirDrop may be selected from the Share menu that shows when you click the Share button.

transfer photos from iPhone to Mac

  • The software will locate and show all Apple users in the immediate region.

transfer photos from iPhone to Mac

  • After selecting a recipient, choose the device and click Done.

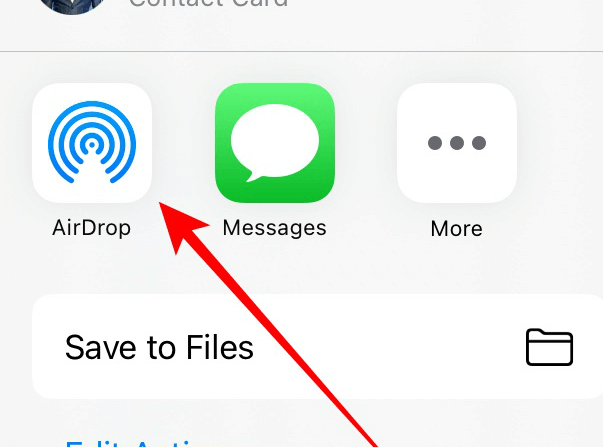
If you are unable to locate the appropriate individual in your contact list, make sure the accepting device is set to be discoverable by everyone.

transfer photos from iPhone to Mac

On Mac, the transferred files are saved in the "Downloads" folder.

Method 4: Using Photos

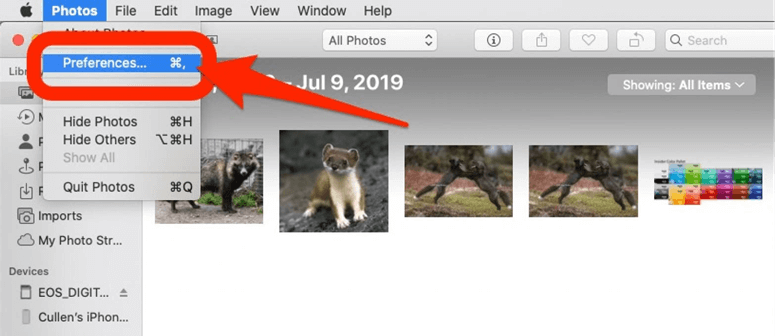
All of your photos and videos may be found in the Photos app on your iPhone and Mac. Since the software keeps everything in one place, it's the best method to move images from your iPhone to a Mac.

  • Open the Photos app on your iPhone after connecting it to your Mac via USB cable.
  • All of your iPhone's photos and videos appear on an Import screen in the Photos app on the Mac. If the Import page does not show, choose the iPhone name from the Photos sidebar.
  • Get your iPhone unlocked. A Trust This Computer message may be shown on an iPhone.
  • Continue by tapping Trust.
  • Selected photos may be imported by clicking Import Selected, while the whole Camera Roll can be imported by clicking Import All New Photos.

What's wrong with my Photos Importing from iPhone to Mac?

There are various reasons why your data don't transfer between your iPhone and your Mac. Let's take a brief look at some of the most common issues that might develop.

  • AirDrop isn't enabled on any of your devices. Whether you're having trouble transferring photographs over AirDrop, check to see if you've activated the feature on your Mac or iPhone. Activate it and give it another go.
  • Macs aren't recognizing Apple's iPhone. The USB cable must be connected properly, and both devices must have the most recent software installed on them to work.
  • The iCloud service has not been activated on your device. It's impossible to access your files from a web browser unless you've set up iCloud on all your devices. Set it up once again.
  • iCloud doesn't display all of my photos. What if you can't find your most recent photos on iCloud? To upload new files to iCloud, make sure your iPhone is connected to the internet through a data or Wi-Fi connection and has enough battery power.

Conclusion

If your iPhone is ever lost, damaged, or stolen, having your images stored on your Mac rather than on your iPhone will provide you with an additional layer of safety.

Transferring an unlimited amount of photos and videos from your iPhone to your Mac is a piece of cake when you follow the steps outlined above. In order to locate a system that is most suitable for your needs.

Hot Magoshare Products

Magoshare Data Recovery for Mac

Magoshare Data Recovery for Mac

The best Mac data recovery software to recover deleted, formatted or lost data.

Free Trial
AweEraser for Mac

AweEraser for Mac

Securely and permanently erase data before selling, donating or giving away Mac.

Free Trial
AweClone for Mac

AweClone for Mac

Clone startup disk, external disk, USB flash drive, memory card and more on Mac.

Free Trial