Easy steps to recover deleted, formatted and lost data from local disk and external device.
Free TrialTo get around the limits of one display, Windows 11’s “Desktops” feature enables you to arrange your apps utilizing virtual desktops. Keeping duties distinct is another benefit of the function. You may designate one desktop for business and another for personal responsibilities. Each desktop can be given a different name, and each virtual space can have another backdrop image.
It's not a new feature, "Desktops." Long accessible under the term "Virtual Desktops," Microsoft chose to rename it with Windows 11. Despite the new name and altered design, the feature still operates in the same manner. This guide will discover how to build and manage desktops on Windows 11.
Why do I need Multiple Desktops?
Since this is a personal preference, it cannot be generalized. To assist you in making a wise choice, we'd like to list the advantages of virtual desktops.
First, grouping and splitting windows makes sense if you access numerous windows simultaneously. For instance, you may have entertainment programs and tabs on one virtual desktop and work-related windows on the other. This makes it comfortable for you to focus by sorting the apps. There are as many virtual desktops as you like where you can have as many different categories as you like.
Second, transferring windows across virtual desktops is as easy as dragging and dropping them. Working on virtual desktops is now simple as a result. Virtual desktops in Windows 11 make working much simpler, despite what some people say.
On Windows 11, you can also set different backgrounds for unique virtual desktops, a feature we've been waiting for a while. Many people prefer to customize their experiences based on their current state of mind or type of work. You no longer need to switch the desktop wallpaper every time; arrange the apps on various desktops and choose the desired background.
Consider it for yourself before deciding.
How to Create Multiple Virtual Desktops in Windows 11?
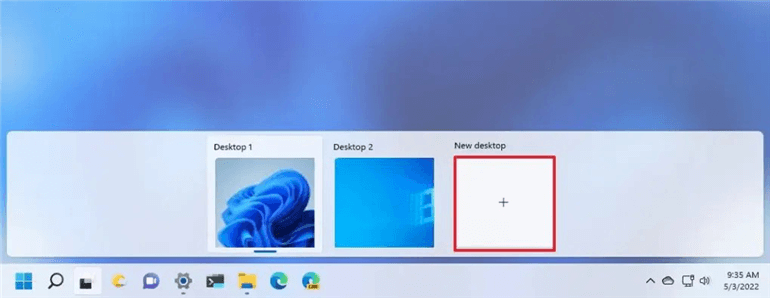
Follow these instructions to establish a new virtual desktop in Windows 11:
In the Taskbar, click the Task View button.
Select the New Desktop option.
Create a new desktop.
To create a virtual desktop, use the Windows key + Ctrl + D keyboard shortcut. The keyboard shortcut will create several desktops if you use them frequently.
If the Task View button isn’t present, right-click the Taskbar and select Taskbar settings, then turn on the Task View toggle switch under the “Taskbar items” section.

View Your Desktops
Once you've begun generating numerous desktops in Windows 11, you'll be able to move between them effortlessly. This may be accomplished using the shortcut keys Windows key + Tab or simply clicking the Task View button on your taskbar.
Switch between virtual desktops on Windows 11
To switch between virtual desktops, follow these steps:
In the Taskbar, click the Task View button.
To move to the bottom of the screen, click the desktop.
To quickly switch between desktops, press the Windows key + Ctrl + Left or Windows key + Ctrl + Right.
Move app to another virtual desktop on Windows 11
To move an app to another virtual desktop, use these steps:
In the Taskbar, click the Task View button.
Right-click the program and select Move to from the context menu.
To relocate the app, select the desktop.
While in Task view, you may click, drag, and drop the software to the desired desktop.
Rename Your Virtual Desktops
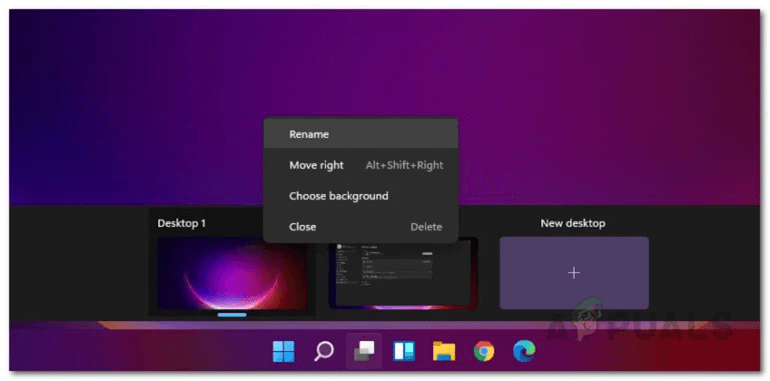
Windows 11 lets you rename your virtual desktops as you wish to keep track of them and move to the correct desktop if you have many desktops operating. To rename your virtual desktops, follow the steps below:
First, open the Task View by selecting the Task View button on the taskbar or hitting the Windows key + Tab.
After that, right-click on the virtual desktop you want to rename and select Rename from the menu that appears.

Rename it as you see fit, and you’re done!
Show app on all virtual desktops on Windows 11
Follow these steps to display the same program on all virtual desktops:
In the Taskbar, click the Task View button.
Select Show this window on all desktops or Show windows from this app by right-clicking the program.
The app will be available on all desktops when you finish the instructions.
Change Virtual Desktops Backgrounds
Finally, Windows 11 allows you to modify the background of each virtual desktop you are running, making the experience even better and cluster-free even when you have numerous desktops operating. This makes it even easier to immediately identify the specific desktop you wish to move, which is beneficial since it leads to efficient multitasking. Follow the steps below to change the backgrounds of your virtual desktops:
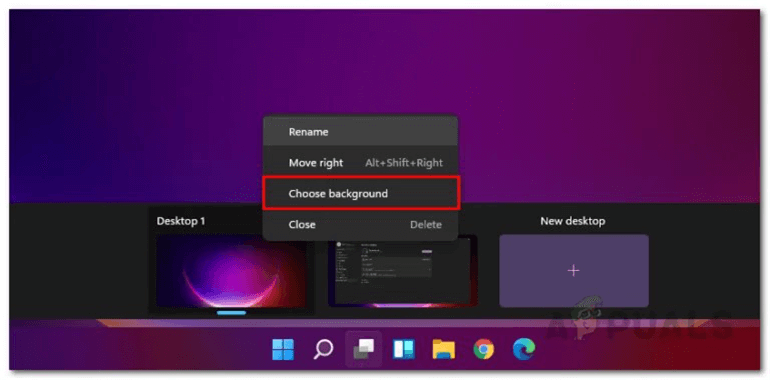
To begin, select the Task View button or use the Windows key + Tab shortcut to see your virtual desktops.
Then, right-click on the desktop for which you want to change the background and select the Choose background option.

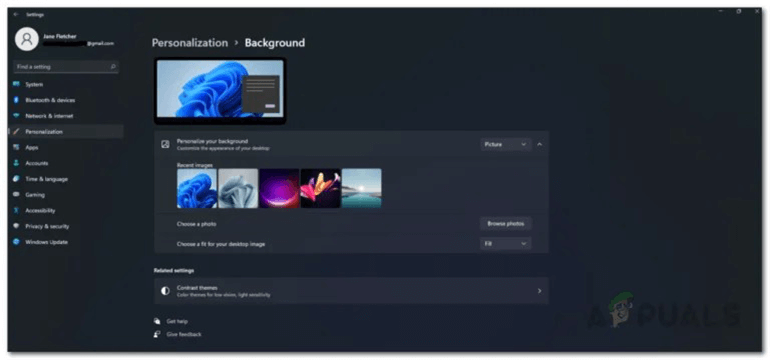
This will launch the Settings panel. You can either use the default Windows 11 wallpaper or browse around your system and select a custom background.
Repeat this step for additional desktops if necessary, and you’ll be set to go.

Close virtual desktop on Windows 11
Follow these methods to close a virtual desktop:
Hover your cursor over the virtual desktops button in your taskbar or click it. You may also reach the Task View interface by pressing the Windows key + Tab.
Hover your cursor over the virtual desktop you want to shut down. When you do this, a close button will appear in the top-left corner of the virtual desktop’s thumbnail.
Press the close button. When you close your virtual desktop, all running foreground programs are relocated to the desktop immediately before it. This eliminates the possibility of mistakenly closing your workflow.
Conclusion
Multiple desktops are not a novel idea but are new in Windows 10. In truth, some third-party applications offered this feature during the Windows XP era.
One of the most remarkable aspects of the Windows OS overall is the multiple desktops function in Windows 10. Working in numerous jobs of various kinds offers a more ordered environment. Additionally, it significantly reduces clutter and cleans up the screen.
Hot Magoshare Products
Securely and permanently erase data before selling, donating or giving away PC and digital device.
Free TrialClone boot disk, external disk, USB flash drive, memory card and more on Windows PC.
Free Trial
