How to Delete Files Without Sending Them to Recycle Bin?

updated on 2022-02-16 to Data Erasure
Quick Navigation:
- Method 1: By Using Shift + Delete Combination
- Method 2: Visiting Recycle Bin Properties
- Method 3: Setting Recycle Bin Frequency
- Method 4: Use a data erasure program
Windows users are well-familiar with the recycle bin. It is a built-in utility offered by Microsoft Windows that stores the files deleted by users from various locations in the PC. Later, they can visit it and empty the recycle bin to ensure that the deleted files are not accessible to anyone.
While it is useful to visit recycle bin after deleting the files from your PC, some users may find it annoying to keep visiting it to double confirm the deletion. For those annoyed Microsoft customers, there are a few official ways that can stop them from visiting recycle bin, every time they want to delete something.
In this article, our readers will find a guide explaining how to delete files without sending them to recycle bin. So, without any delay, let us get straight to our point.
Method 1: By Using Shift + Delete Combination
Most of the users reading this article may already be familiar with this method. It is a very easy way to ensure that you do not have to visit recycle bin after deleting the files. For those who are new to this, here is how it works.
Firstly, select the file or folder that you want to delete. Right-click on it and press the Shift and Delete buttons in the given order at the same time. A Delete File Windows tab will appear which will ask for your permission to confirm the permanent deletion of the selected file.
If you select Yes, then the selected file will be permanently deleted while also saving the 2nd step that involves a visit to recycle bin. You can verify it by checking the recycle bin as you should not be able to find the deleted file there.
Conversely, if you select No, then no action will be taken against your selected file.
Method 2: Visiting Recycle Bin Properties
While the previous method is very well-known to Windows users, this method can be more of a new discovery to our readers. It includes changing the settings of the conventional deletion method thus eliminating the need to visit recycle bin again. Here’s how.
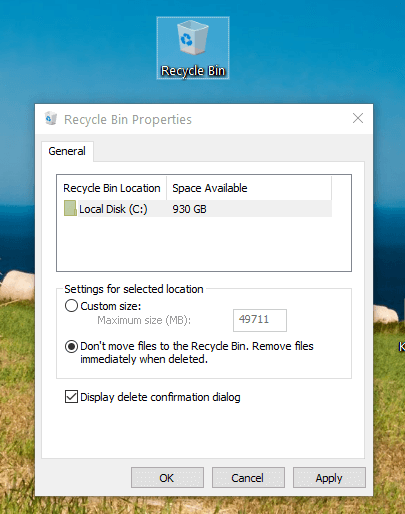
Locate the recycle bin on the desktop of your PC and open its properties by right-clicking on it. You will see an option saying, “Don’t move files to the recycle bin. Remove files immediately when deleted.” Select it so that it can be enabled.
Below this option, do not forget to tick the box that asks to Display delete confirmation dialog box. After selecting these options, click on Apply and then Ok. That’s it, no more errands to recycle bin anymore.
You can test this method by simply clicking the Delete button on your keyboard on the required file, or you can select the Delete option from the drop-down menu by right-clicking the target file. Once you delete the file, visit your Recycle Bin. The deleted file should not be there.
Previously, we asked you to also select the Display delete confirmation dialog box as it is a very useful tool while deleting the files, especially when the recycle bin skip is enabled from the above-mentioned method.
It ensures that you do not accidentally delete your important file/s by an accidental touch on the Delete button of your keyboard. Therefore, it is only wise to select it to keep your files from disappearing.
Method 3: Setting Recycle Bin Frequency
This is the 3rd method to answer the burning question which is how to delete files without sending them to recycle bin. With this method, you are going to send the files to your recycle bin, but you will not necessarily have to visit your recycle bin to delete the files.
Microsoft allows the user to set a frequency after which the files will be automatically deleted from the computer which again must be very new to most users. By default, it is set to 30 days (in Windows 10), but the user can do the variation from the method below.
Right-click on the Windows icon from the toolbar in the bottom-left corner. Click Settings and then, System. It will open a Windows tab. On this tab, on the list on the right side, click on Storage. On this new page, at the top, you will see the Storage Sense toggle turned off by default.
If you enable this option, then after a certain frequency, Windows will start to automatically clear the recycle bin. Click on Configure Storage Sense or run it now button. It will further open a tab with different options.
You can set the Storage Sense to run every day, week, or month depending upon your requirement.
You can also set it to run once disk space reaches a low level. In the Temporary Files section, click the drop-down menu of “Delete files in my recycle bin if they have been there for over:” and choose the suitable deletion frequency.
You can choose among 60, 30, 14, 1, and never options to suit your schedule.
Method 4: Use a data erasure program
This is a different kind of solution than the previously mentioned methods. It involves 3rd party erasure software that can let you delete your data in a permanent manner.
A erasure software also promises to delete data without leaving any traces behind so that it cannot be accessed later by some intruder. Deleting PC data using official methods will not remove it completely and can be accessed, for example, with recovery software.
However, it should be okay as long as you are not going to sell or give your PC or its hard disk to someone outside. AweEraser is a powerful data erasure program, it can help you securely and permanently shred files.
Data Eraser - AweEraser
- Permanently delete files, folders.
- Wipe hard drive, wipe deleted data.
- Uninstall unwanted programs and clean up all leftovers.


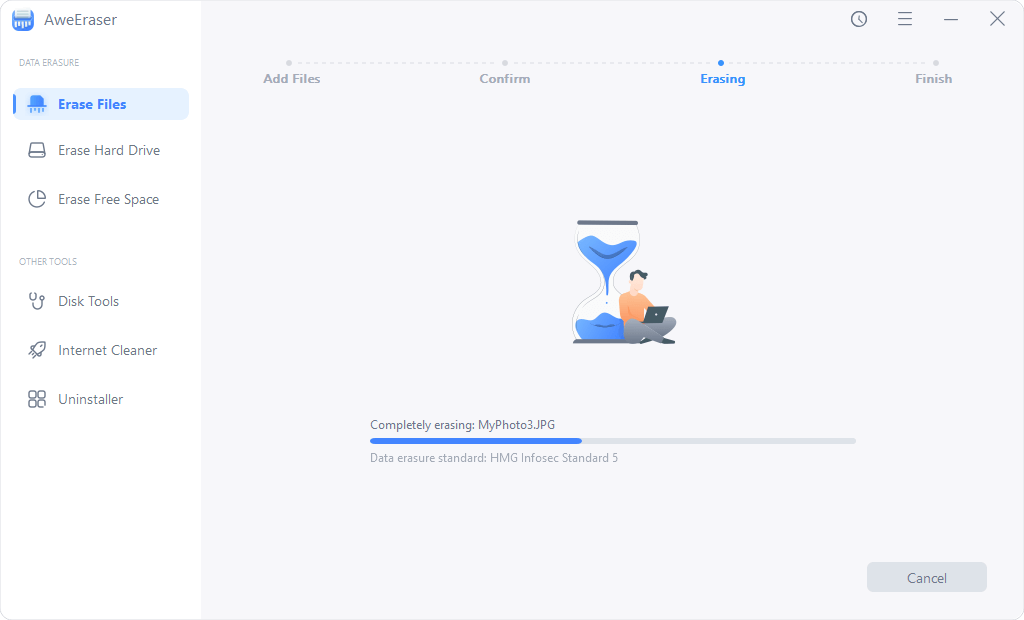
Just open AweEraser on your computer, choose mode - Erase Files. Then select the files or folders you want to erase.
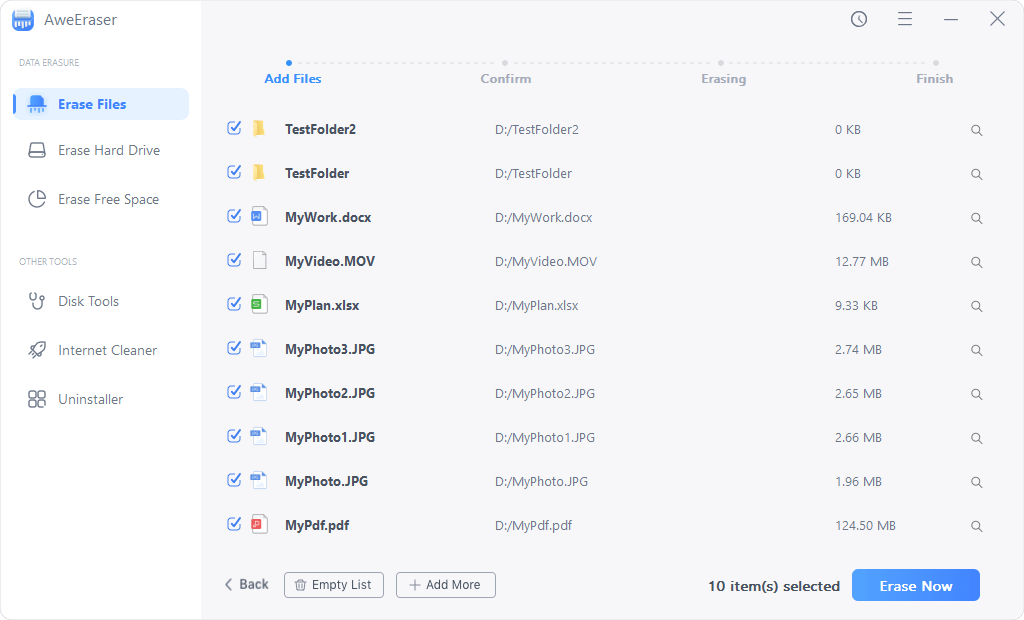
Click on Erase button to permanently shred the selected files/folders.
Conclusion
In this article, we tried to give a comprehensive answer to the question asking how to delete files without sending them to recycle bin. Although there are official methods available to answer it, one can also use a 3rd party software for advanced solutions.