Downgrade macOS Monterey to macOS Big Sur, Catalina Or Earlier

updated on 2022-04-05 to Disk Clone Solution

If you want to downgrade macOS Monterey to Big Sur, Catalina, Mojave, or High Sierra, there are a few options. You've come to the right place. This article will teach you how to downgrade macOS to a previous version in three different methods.
It's alluring to upgrade to the latest macOS. However, you may come to regret your decision if you upgrade. Incompatible software, too many flaws, and a sluggish Mac are all common causes. It's simple to install a new version of macOS, but it's more difficult to downgrade. We'll teach you how to roll back macOS Monterey to an older Big Sur, Catalina, Mojave, High Sierra, or Sierra in three different ways in this post.
Make a backup of your Mac
First and foremost, make a backup of your Mac. All data on your Mac will be erased when you reinstall macOS. If you have backed up your key files, you may easily recover them after reinstalling macOS.
How to Revert to the Mac's Original Operating System
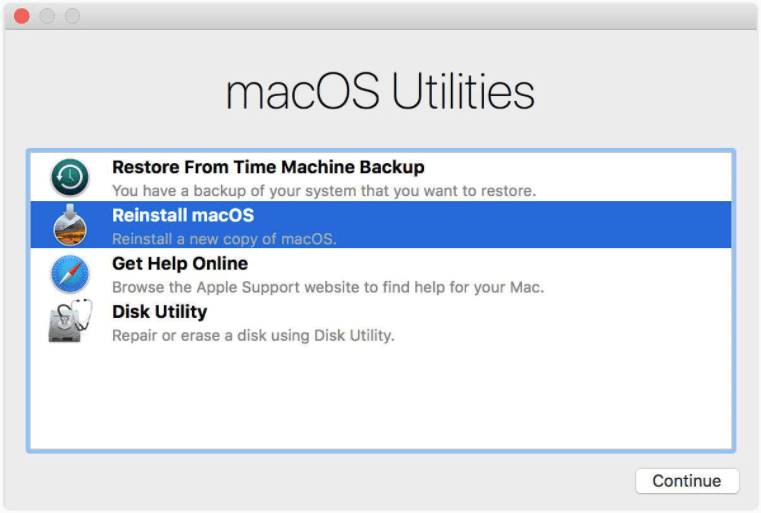
You may rapidly downgrade from High Sierra or a later release of macOS to the version that came with your Mac when you bought it using Mac's built-in macOS Recovery function if you're running High Sierra or a later edition of macOS. All you have to do now is make sure your Mac is hooked up to the internet. The steps are as follows:
- Restart your Mac after closing it.
- Press Shift + Option + Control + R until the macOS Utilities appear.
- Select the Reinstall macOS option from the macOS utility menu.
- Continue by clicking Continue and following the on-screen instructions.
- Click Install after selecting your starting disk.
- After the installation is complete, your Mac will restart.
- Reinstall the macOS that came with your Mac to uninstall Monterey.
Before you begin the reinstallation process, make a backup of your Mac.
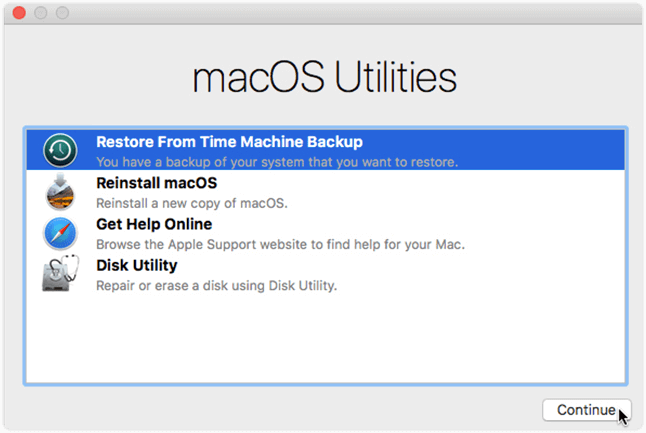
How to Restore a Time Machine Backup and Downgrade macOS
Time Machine Backup is another option to downgrade your macOS, but only if you have already backed up your prior macOS with Time Machine.
This is what you must do.
- Launch your Mac and press Command + R at the same time to boot into the built-in macOS Regenerator (Press Power button if you are using a Apple Silicon Mac).
- Press these two keys down until the Apple logo or another picture appears.
- Choose Restore from a Time Machine backup in the macOS utility window and click the “next” button.
- Follow The on-screen after selecting your Time Machine backup.
- Restore the files you backed up when the reinstallation is finished.
Using a Bootable Installer to Downgrade macOS
How about if you don't have a Time Machine restoration but still want to go back to a previous macOS version? Don't be concerned. We'll teach you how to use a bootable installer to install a reduced macOS. This approach is more difficult than the previous two ways. We've broken down the processes into four sections to make them easier to comprehend. Let's have a look at it right now.
Part 1: Set Up an External Hard Drive
You'll need a 14GB external hard disk. Despite the fact that macOS is around 12GB in size, you will still want more storage space. As a result, double-check that your external disk has enough capacity.
There might be other files on your hard disk. It will need to be formatted.
- Connect your hard disk to your Mac.
- Using Spotlight, open the Disk Utility software.
- In the sidebar, choose your drive and then click the Erase button at the top of the window.
- Monterey has been downgraded: the external drive has been erased.
- Choose a format that your Mac accepts from the Format drop-down option and name your drive volume.
- Choose Mac OS Extended if your Mac utilizes HFS+ (Journaled).
- Choose APFS if your Mac utilizes it.
- Open the Terminal app and type and run the command diskutil info to see what format your Mac is using.
- Pick GUID Partition Map if the Algorithm is accessible.
- Then, after clicking the Erase option, click Done.
- Monterey has been downgraded: format the external drive.
Part 2: Installers for Mac OS
If you already have the version of macOS you want to download, everything you would have to do is access the Apple Store and download it again.
You won't be able to obtain a version of macOS that you haven't already downloaded from the Apple Store if you wish to downgrade. You may use this article as a reference right now.
Part 3: Make Your Installer Bootable
You've finished setting up the external drive and macOS installation. Let's get started with making your bootable installation.
- Connect your Mac to your formatted hard disk.
- Launch the Terminal application.
- Enter and run a command.
That's all there is to know about downgrading macOS Monterey to a previous version. Before you downgrade your macOS, make a backup of your computer.
AweClone for Mac is a powerful disk cloning software, it can help you easily clone macOS and create bootable disk. Download it here:
AweClone for Mac
- Easily clone data on Mac.
- Create bootable disk for macOS.
- Restore macOS via cloned disk.

