How to Use macOS Recovery Mode on Apple M2 Chip Mac?

updated on 2022-10-11 to Mac Disk Clone
In place of an Intel chip, your new MacBook Air, MacBook Pro, iMac, Mac Studio, or Mac Mini almost probably uses one of Apple's processors, the Apple Silicon M1 or Apple Silicon M2. You probably won't notice any operational differences in day-to-day use, which is good. However, there are entirely new processes to wipe the M1 and M2-based models when resetting the new Mac, whether you're selling it, passing it on, or fixing it.
More specifically, there have been changes to the procedures for launching Recovery Mode, the program you need to utilize to reset your Mac. We'll show you how to enter macOS Recovery Mode, use all the available tools, and offer a few workarounds for issues we ran into.
What is macOS Recovery mode?
Macs can be started in a special mode called macOS Recovery that uses a built-in Recovery HD partition (also known as macOS Base System), and a utility called Recovery Assistant.
In other words, it is a recovery program that may be run without first launching the Mac operating system, aiding in resolving system-related problems like the Mac white screen issue. It allows you to perform simple Mac recovery and troubleshooting tasks like disc verification, OS reinstallation, and startup security adjustment.
How to access macOS Recovery on an Apple Silicon M2 Mac?
The Apple icon should be clicked to shut off your Mac. Hold down the power button once your computer has completely shut down. You'll notice wording immediately below the Apple logo when it initially displays, instructing you to keep pushing it to obtain startup settings. Press it for around five seconds until the text changes to "Loading startup options." Click Options > Continue after that.
When prompted, choose a user with administrator rights (presumably you, if you first configured the machine) and enter the account password.
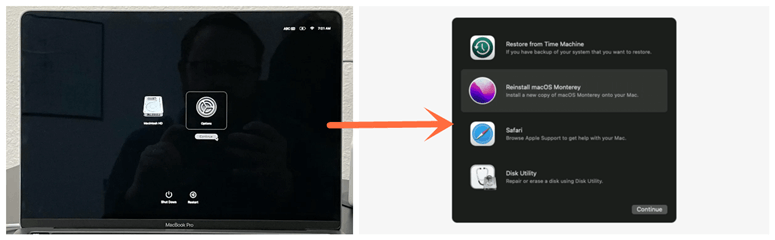
The new recovery tool gives you a few options
Upon logging into a user account, a list of Apps accessible in Recovery will appear.
Time Machine System Restore:
Your data can be restored using a Time Machine backup. Choose Restore From Time Machine in the Recovery app, then press Continue. Select Time Machine System Restore > Quit Time Machine System Restore to return to the Recovery program. See, You may restore your system using Time Machine.
Install macOS Monterey:
On your PC, reinstall macOS. Choose Reinstall macOS Monterey in the Recovery app, then choose Continue. Select Install macOS Monterey > Quit Install macOS to return to the Recovery software. See Install macOS again.
Recovery:
Additional programs in macOS Recovery can be accessed through the Recovery app. Start up your machine in macOS Recovery, pair Bluetooth input devices while it's running, and then exit macOS Recovery.
Terminal:
Utilize the command line to change settings—select Terminal from the utility menu in the Recovery app. Then select Terminal > Quit Terminal to return to the Recovery app.
Safari:
Click Continue after selecting Safari in the Recovery app. Select Safari > Quit Safari to return to the Recovery app. If you have internet access, you can use Safari to look up more details on the Apple Support website. It should be noted that Safari’s extensions and plug-ins are disabled under macOS Recovery.
Startup Security Utility:
Set your Mac's security parameters. Select Startup Security Utility under Utilities in the Recovery app. Select Startup Disk > Quit Startup Disk to return to the Recovery software. See Modify the security protocol.
Startup Disk:
Set Mac's startup disc. Choose Startup Disk from the Apple menu. To quit the app, choose Startup Disk > Quit Startup Disk.
Disk Utility:
You can fix or delete your disk. Select Disk Utility in the Recovery app, then click Continue. By selecting Disk Utility > Quit Disk Utility, you can return to the Recovery program. See Repair your internal storage device and reinstall macOS.
Share Disk:
Share Mac's disc when it boots into macOS Recovery. Select Share Disk from the utility menu in the Recovery program. See. To move files between two Mac machines, use Share Disk.
Erase the hard drive, reinstall macOS
Open Disk Utility, choose the internal disk with the label Macintosh HD and then reinstall macOS to erase all of your data from the hard drive. Check if the option labeled "Erase Volume Group" is present. Leave the volume name and format alone, but for reference, it usually is "Macintosh HD" for the word, and you should use AFPS for the design.
All your files, user accounts, and apps will be erased from the hard disc shortly afterward. After completing that, shut off Disk Utility and choose Reinstall macOS from the menu. When prompted to select an installation location, choose Macintosh HD (or whatever name you gave your hard drive if you decided to change it).
After downloading and installing the most recent version of macOS, your Mac will behave precisely as though it had never been configured.
How to fix the ‘No users available for authorization’ error?
The steps I described above, which are those recommended by Apple on its support page, were followed. Still, I ultimately encountered an error message stating that no authorized user was available to accept the reinstallation of macOS. Following user reports of the same bug, Apple has offered guidance on how to fix it.
Select the grayed-out "Data" drive in Disk Utility and wipe it to finish the OS reinstallation. After it has been deleted (again, using AFPS format when promoted), you should have no trouble installing macOS.
If you can’t create a new user account
After reinstalling macOS, I could not establish a new user account because the MacBook Pro would freeze whenever I attempted to create the default user account. This occurs because macOS is looking for account information in a location where it is no longer there.
If the computer isn't crashing, try restarting it in recovery mode, opening Terminal, entering "resetpassword" at the command line, and selecting the Reset Password option. Then, start the Recovery Assistant from the menu bar, choose Erase Mac, or use Disk Utility to remove the Data partition, as mentioned in the previous paragraph. This is from an earlier thread on the forums at Apple.
Note: If you want to create a bootable clone backup for M2 chip Mac, just try AweClone for Mac to help you securely and easily create a bootable clone for your M2 Mac.
AweClone for Mac
- Securely clone HDD, SSD and external device on M2 Chip MacBook Air.
- Create disk image for M2 Chip MacBook Air.
- Create bootable clone backup for M2 Chip MacBook Air.

