How to Hide Recycle Bin on Windows 10 Desktop?

updated on 2022-01-26 to How To
The Recycle Bin is a basic utility for deleting data in Microsoft Windows. It allows the users to remove or restore the data that they would have deleted earlier to free up some space and store it in Recycle Bin. And the process is no different with Windows 10 like previous generations of Windows.
One thing that Windows does by default is to place the Recycle Bin icon on the desktop of a computer. While many users find this useful as it allows them to clear or restore the data easily, there is a league of people that may find it annoying instead.
Many people want their computer’s desktop to remain clean and clear without any shortcut on it. I, myself, have remained intrigued that there may be a way to remove the Recycle Bin from the desktop since there are no visible options to do this on the desktop. Now finally, I have found a way to get rid of it from my desktop and keep my desktop wallpaper hurdle-free.
This article will present a guide explaining how to hide Recycle Bin on Windows 10 desktop. Besides our main topic, we will discuss a couple of features that can be a surprise for the Windows users confronting Recycle Bin every day. So, stay tuned till the end of this article.
How to Hide Recycle Bin on Windows 10 Desktop
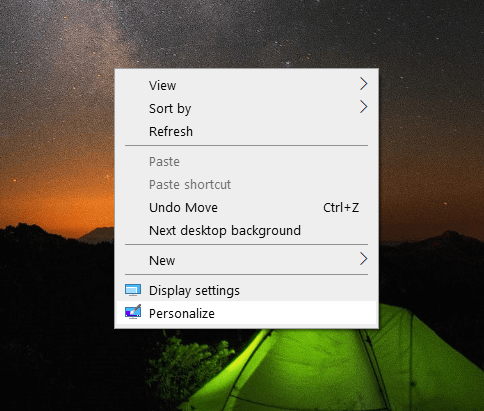
To hide the Recycle Bin on your Windows 10 desktop, click anywhere on the desktop in the empty space. From the options’ tray, find and click on Personalize option. Usually, it is the last option of this menu.
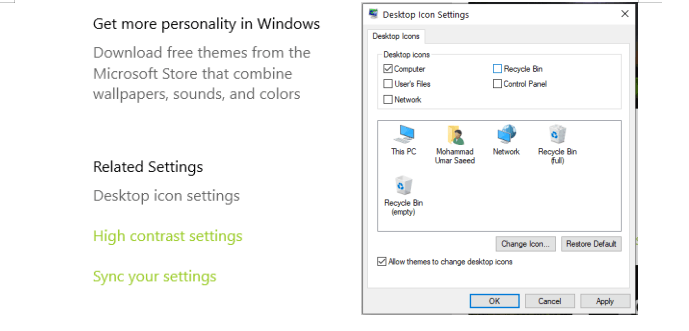
It will result in a Settings window. On the left side of this window, click on Themes. On the right side of the Themes page, you will see related settings and different options under it. Click on the Desktop icon settings button; it must be the first option.
It will open another window where different Desktop icon options will be available including the Recycle Bin. It must be ticked. Uncheck this option and click on the Apply button on the bottom right side and then OK.
To test this procedure, visit your desktop again. The Recycle Bin must be in the hidden state now although you can still use its functions. You can find the Recycle Bin through the Search option of Windows 10 by typing ‘Recycle Bin’ and still find your deleted files there.
In case you have changed your mind and want to see the Recycle Bin again on your desktop, then you can follow the same guide given above to bring it back. Just check the empty box next to the Recycle Bin option, click on the Apply button, and then OK. It will reappear on your desktop.
Moving forward, we will learn a couple of bonus steps below that the Windows users may find useful.
Your Recycle Bin Does More Than Deleting the User Data
The Recycle Bin is a great utility to clear up computer scratch that space by permanently clearing the deleted files. But a few people may not know that it can do things the other way around as well. That’s right, it can move back the data where it belonged once.
Windows Recycle Bin has an option to restore the data back to the exact location where you may have stored it before deletion. This allows the users to get back their data in case they change their mind not to delete it permanently.
This feature is not to be confused with recovery software that claims to restore the permanently deleted data on your PC. Rather, it will only return the data that the Recycle Bin contains. Also, this will not help at all in case the data was deleted with the Shift + Delete combo as this combination deletes the data without sending it to the Recycle Bin.
This is how you can restore the data from your Recycle Bin.
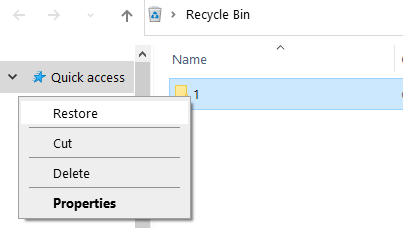
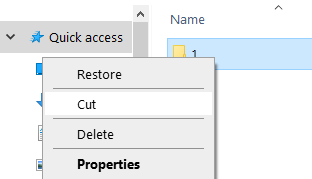
Open the Recycle Bin and search for the data/file in it that you want to restore to its original location. Right-click on it and then Restore must be the first option from the drop-down menu. Click on it to restore your data. If you want to move your data to another location from Recycle Bin, then click on the Cut option right below the Restore option and paste your data wherever you want on your PC.
If you can’t find your deleted files in recycle bin, just use a data recovery software to help you recover deleted/lost files. Guide: recover deleted files on Windows 11/10/8/7/Vista >>
Set your Recycle Bin to Automatically Delete Your Data
If you want your Recycle Bin to clear the data on its own, then it is also possible as Windows can officially do this. This way, you will not have to visit your Recycle Bin again and again to clear it. Instead, all your data stored in it can clear away after a set number of days.
Setting this up is easy. Right-click on the Windows Icon of your toolbar and select Settings. Then, click on System and then Storage from a list of options on the on-screen Window on the left side. On the top of the Storage window, you will see some text ‘Storage sense can automatically free up…….’.
You can select the On and Off button right below this text to enable the automatic clearance of your data from the Recycle Bin. Moving forward, below this button, you will see the clickable text ‘Configure Storage Sense or run it now’.
You will see different configurable options by clicking on this text. From here, you can select from either a configurable frequency of every day, week, month, or when the disk space gets low. Further below, you can also select from a frequency of days i.e., 60, 30, 14, and 1 day that suits you the best.
Concluding Remarks
This article gave a step-by-step guide to explain how to hide Recycle Bin on Windows 10 desktop. This is a useful process for those who want their desktop to look clean and tidy. However, doing this can make it a bit difficult to access the Recycle Bin.
In addition to this guide, we have also listed a couple of steps that may be common yet unfamiliar to some Windows users, explaining how to configure the Recycle Bin to automatically clear it and how to restore Recycle Bin data to its original or a different location. So, this was the article, I hope our readers will find it useful.
Thank you for reading.