How to Enable ‘Full Disk Access’ in macOS?
updated on 2020-03-19 to FAQ
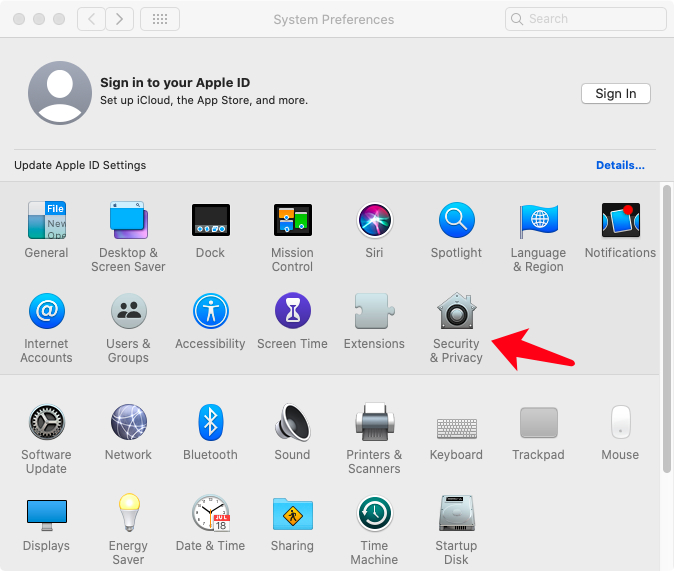
Full Disk Access is a new security feature in macOS that requires some applications to be given full permission to access a user's protected files. This way, only applications that are approved can gain access. In previous versions of macOS, this permission was automatically given to all applications at the time of installation. If a user chooses not to give Full Disk Access, some data on the Mac will not be accessible. This is especially important for applications that need to perform specifics tasks such as scanning data, such as AweCleaner, AweEraser, Disk Clone, Data Recovery, etc.
How to Enable ‘Full Disk Access’?
It is very easy to enable Full Disk Access for an application.
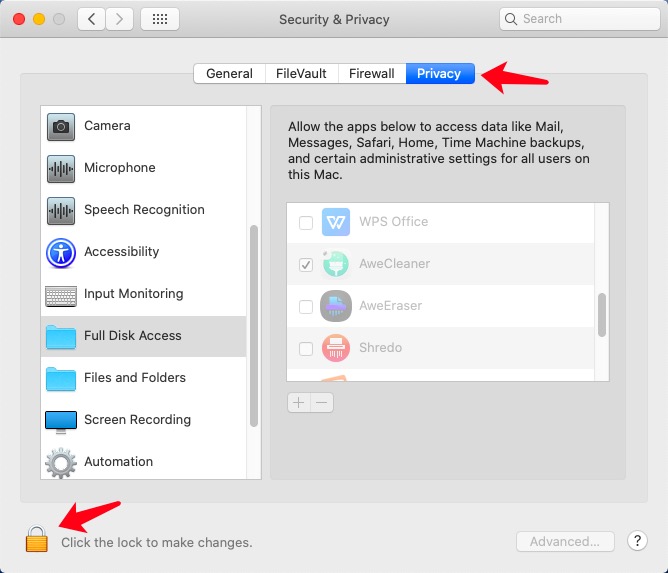
- Open the Security & Privacy pane of System Preferences and click the Privacy tab.
- Click the padlock to unlock the pane and enter your Mac password.
- In the list at left select Full Disk Access, select the targeted application checkbox in the right side of the pane.
- Quit System Preferences and reopen the targeted application.
For example, here is a simple guide to help you enable Full Disk Access for AweCleaner:
Step1. Open the Security & Privacy pane of System Preferences and click the Privacy tab.
Step 2. Click the padlock to unlock the pane and enter your Mac password.
Step 3. In the list at left select Full Disk Access, select the AweCleaner checkbox in the right side of the pane.
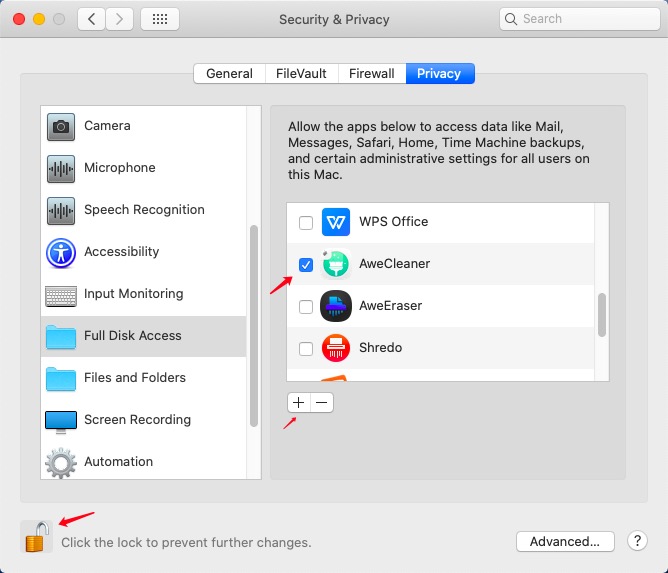
If you can’t find MacClean360 icon, just click + to add AweCleaner to the list or directly drag the AweCleaner icon to the list.
Step 4. Quit System Preferences and reopen the AweCleaner.
If you have any question, you can send an email to support@magoshare.com, we will reply you as soon as possible.
Related Articles
![Hot Products]() Hot Products
Hot Products
![Hot Articles]() Hot Articles
Hot Articles
- How to Speed Up Mac Boot Time?
- How to Quickly Clean up Junk on Mac?
- Mac Cleaning Software for macOS Sierra
- Top 5 Mac Cleaner Reviews and Download
- macOS 10.13 High Sierra Data Recovery Freeware
- Mac DIY Data Recovery Software
- How to Recover Formatted Hard Drive on Mac?
- Reliable Mac Photo Recovery Solution
- Top 5 Mac Data Recovery Application
- Deleted File Recovery Software for macOS 10.13
- Easy Way to Recover Deleted Videos on Mac
- Recover Audio Files from Mac with Freeware
- Best Way to Recover Deleted Folders on Mac
- Recover Deleted Files from Emptied Trash Bin on Mac
- Recover Deleted Microsoft Office Files on Mac
- Mac USB Drive Data Recovery Solution
- Recover Lost Data from Unrecognized USB Flash Drive on Mac